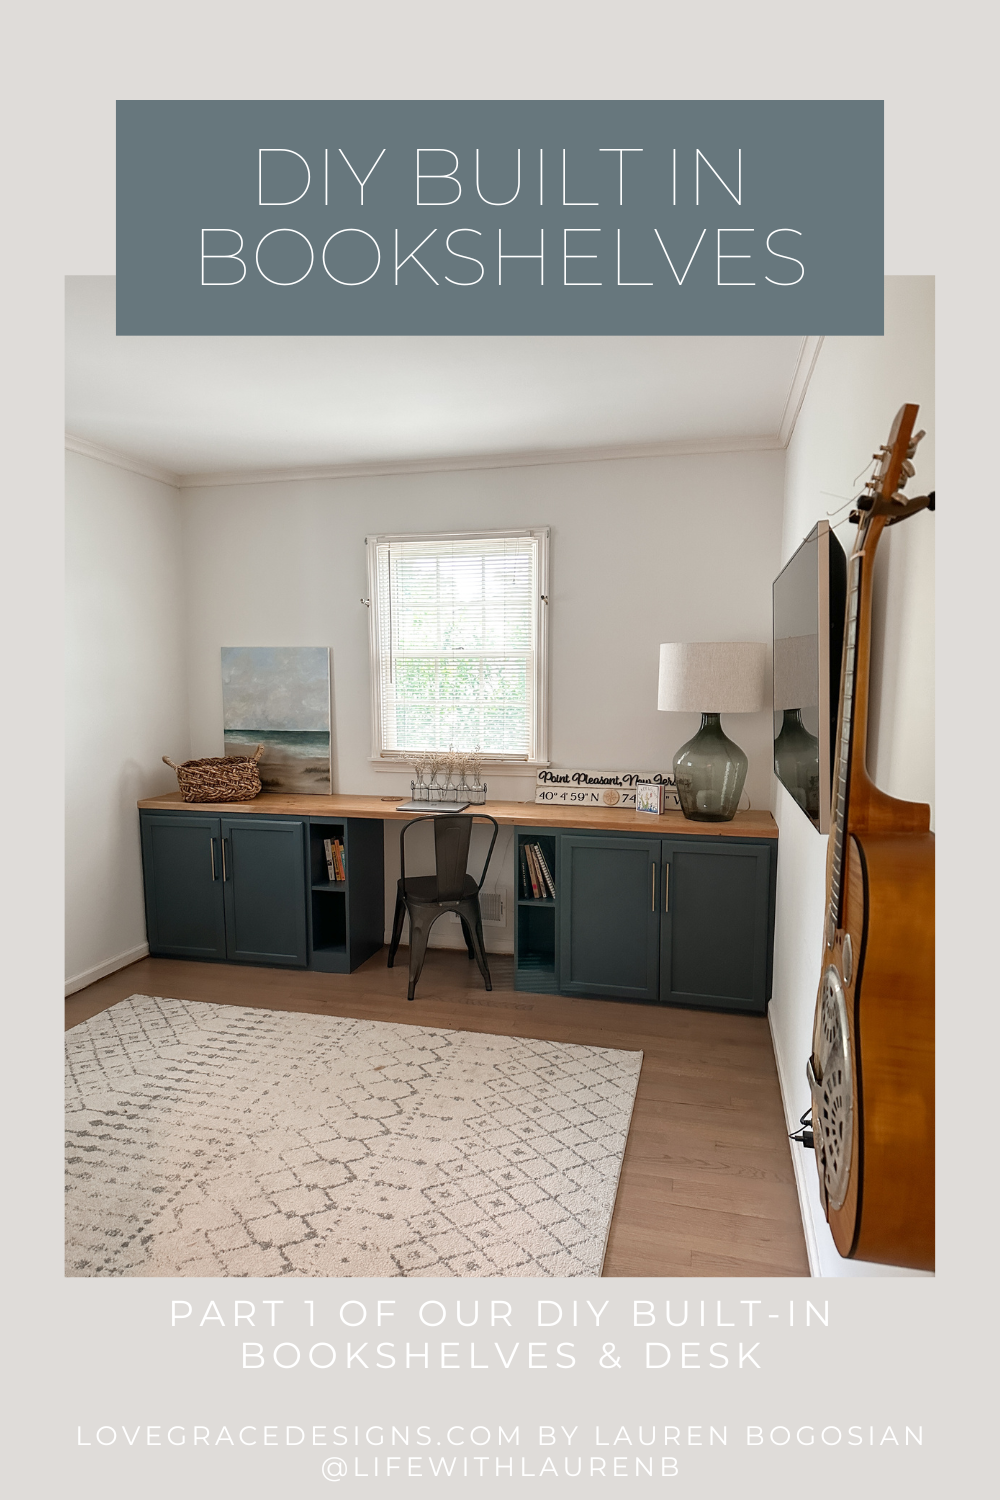
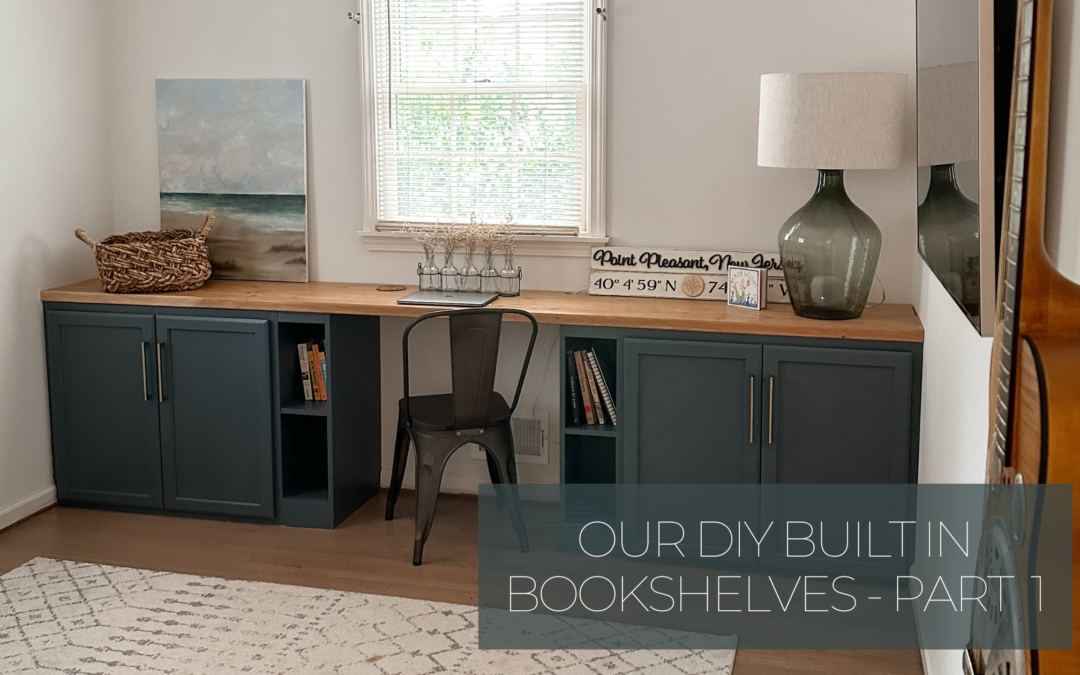
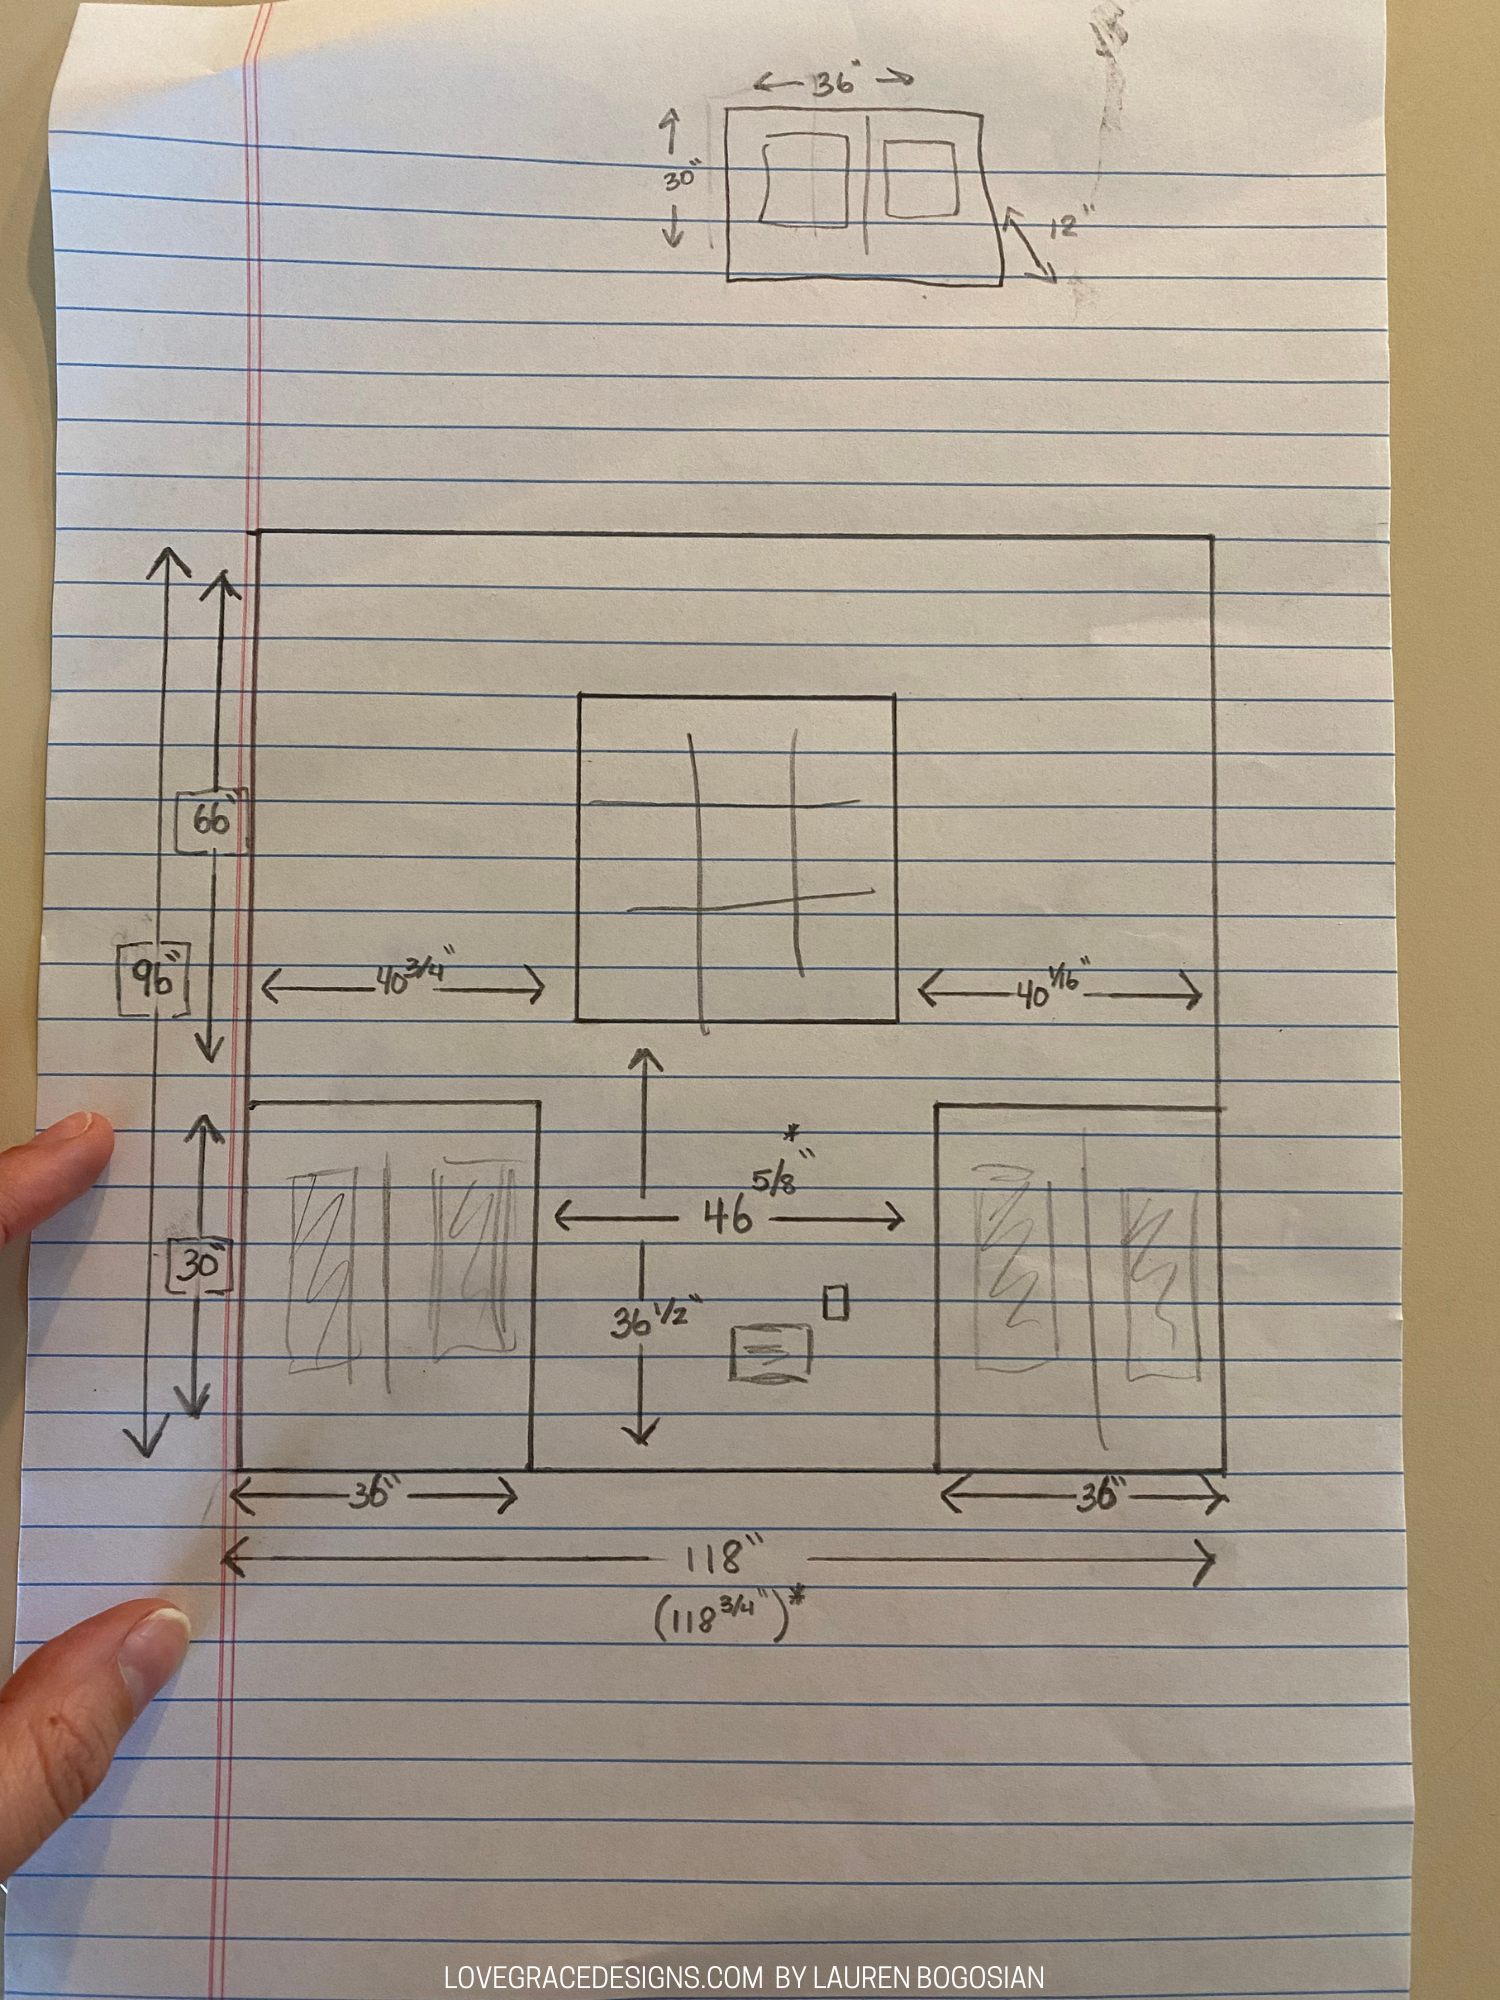
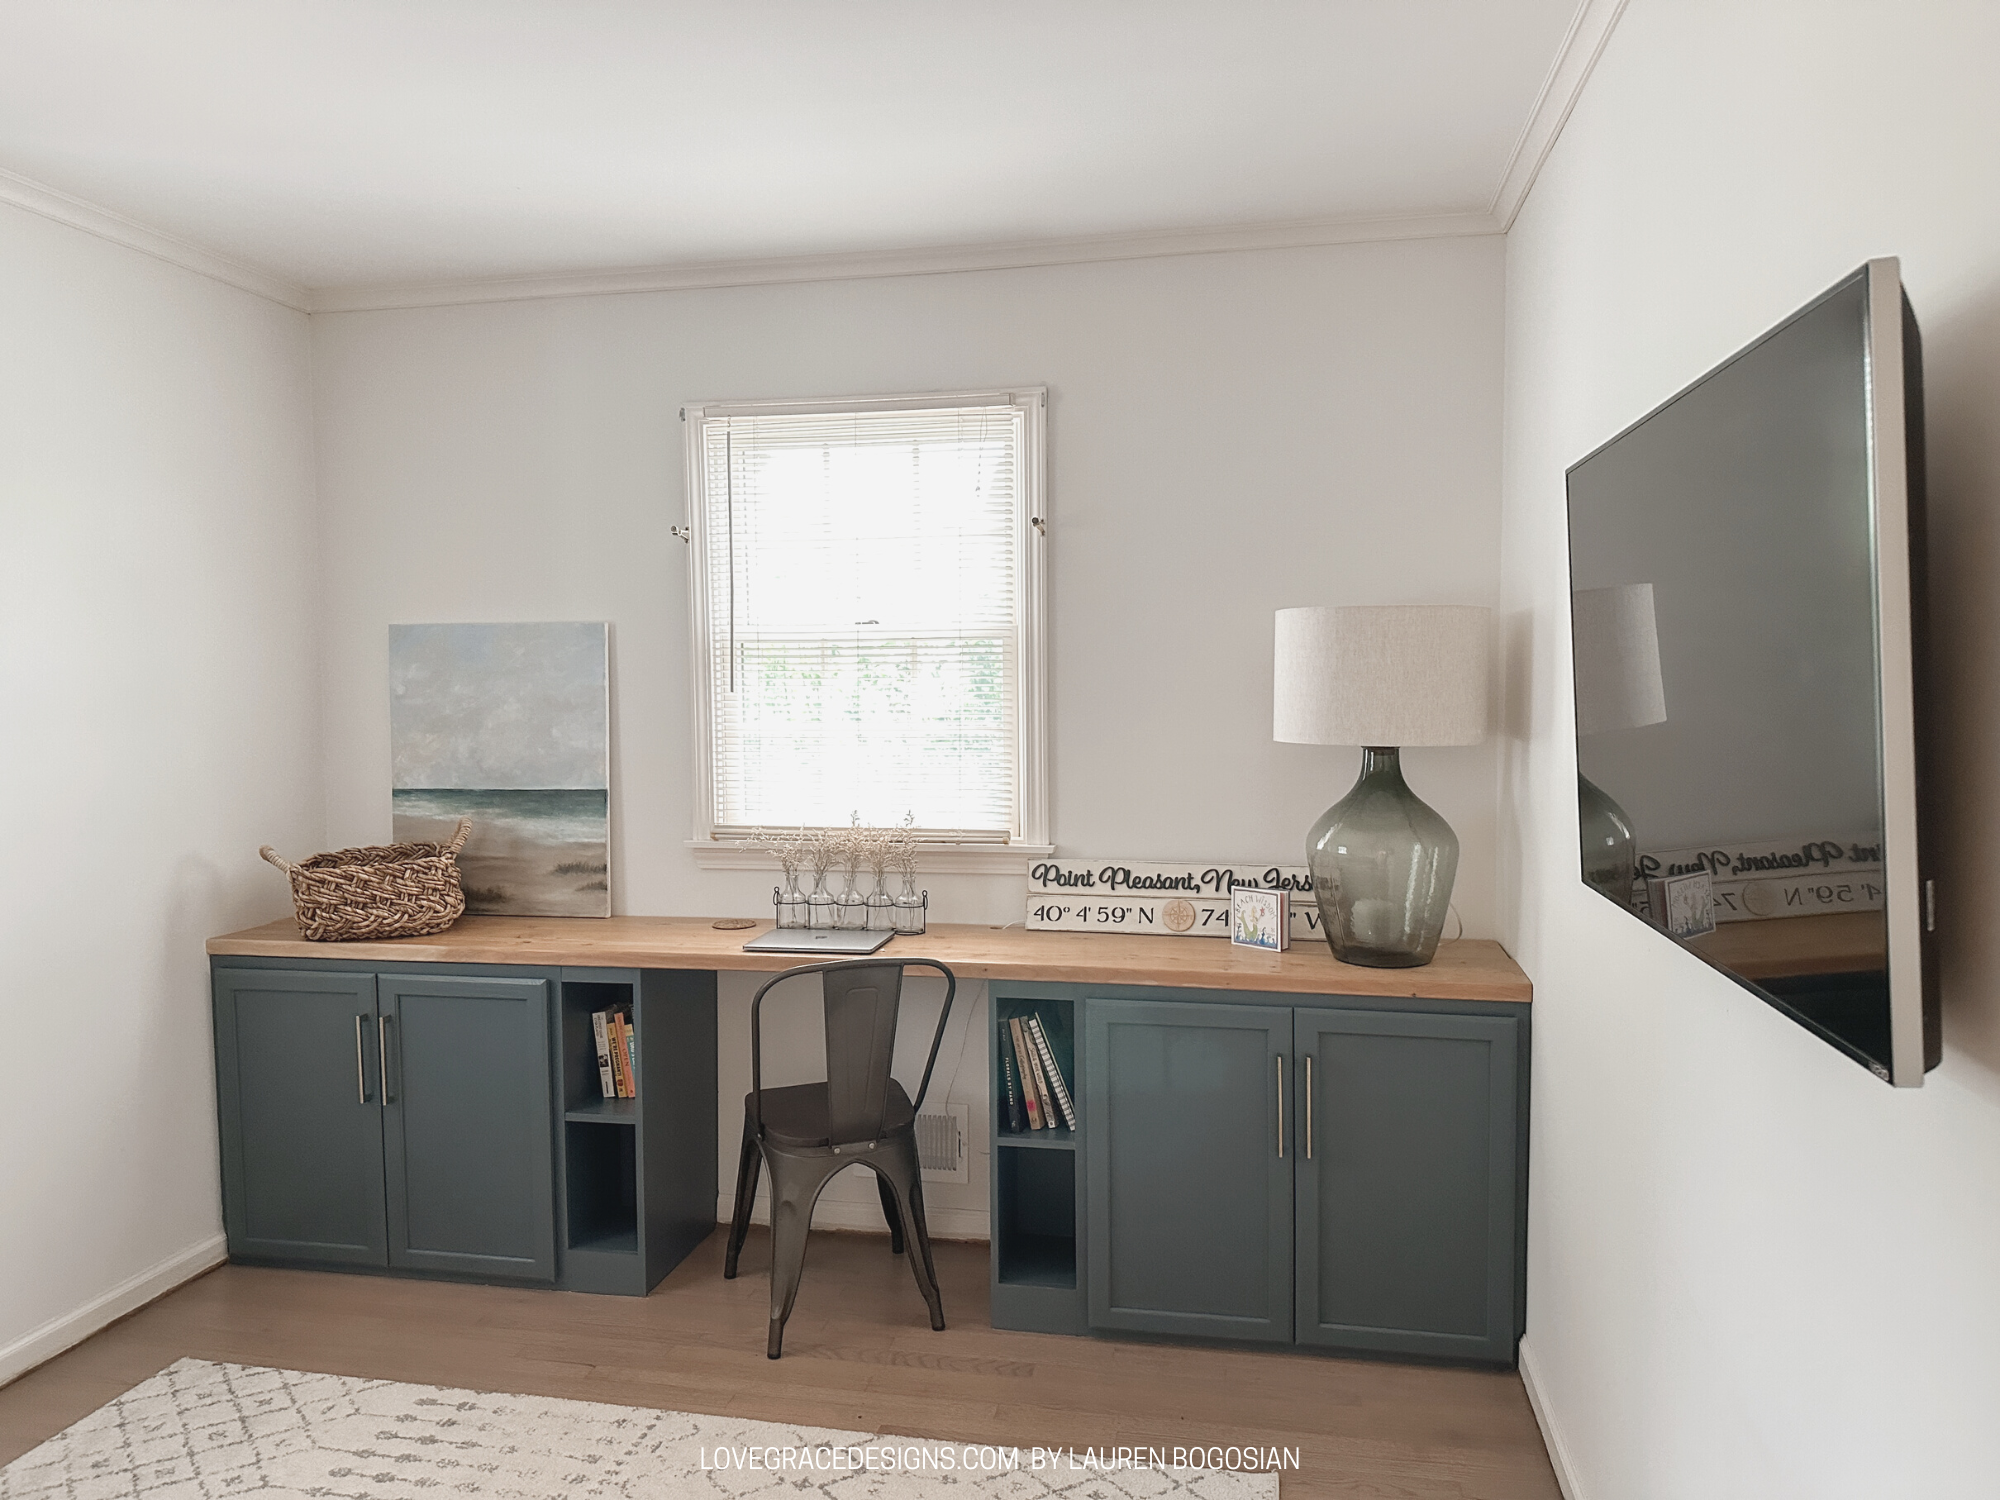
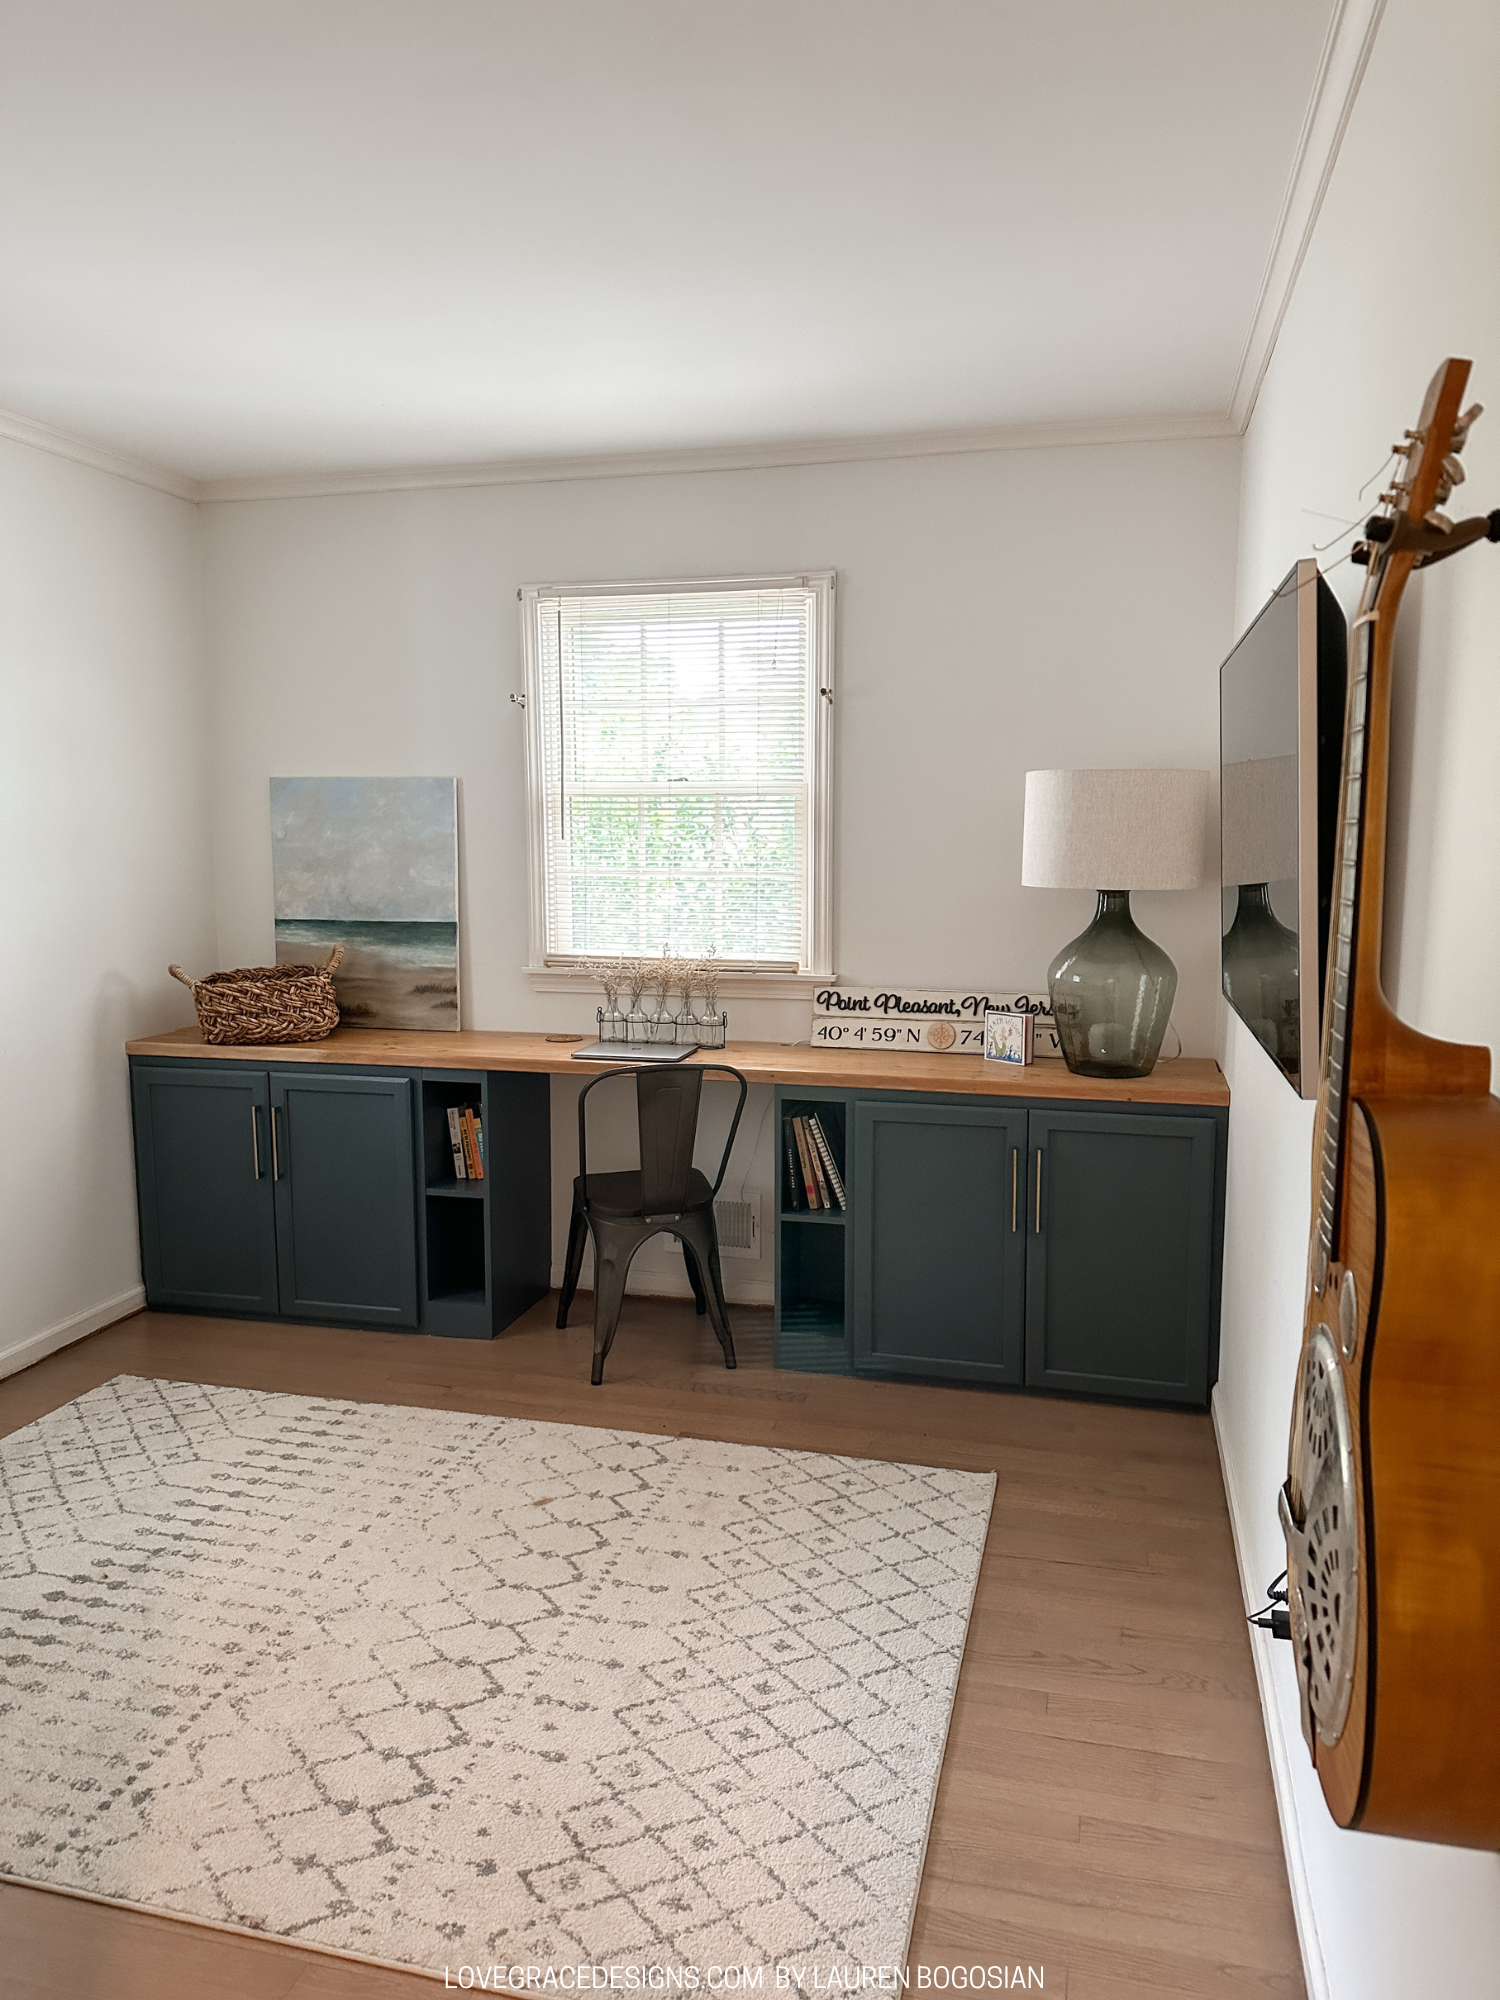
This has been the longest ‘simple’ DIY to date for us. I envisioned having a built-in bookcase with a desk for our spare room for a long time now and last spring (2022) we were ready to start getting everything to build them! I sketched up my idea with pencil on a piece of paper and measured everything we would need. The project started and then I had Graham and it was a slowww crawl to finish ever since but we are finally finished! Well, finished with the first phase. We completed the bottom portion and phase 2 will include the top bookshelves.
The Vision
I wanted to utilize this room’s spare space better for our needs AND future needs. Before I was even pregnant, I was being realistic in the fact that we only have 3 bedrooms in this house and we would like more than 1 child. I grew up with only 3 bedrooms and next to NO closet space so I was used to this, Steve is not. Our house luckily has amazing storage and closet space so we have a lot to work with, but this room could still be way more functional.
This room is kind of a catch-all. We workout in this room so the weights are in there. All of my art stuff, including the art table, is in there and all of Steve’s music stuff and instruments are in there. I initially visioned it as the art and music room. When I started working from home, it became the space that could also be more of a formal office, art/music room, and the room where we workout. In the future, my vision is having this room as Graham’s bedroom so the desk space can be used for homework and the nursery would have a second child in it. I’d rather do this room once for all scenarios than constantly reworking the space to catch up with what is happening.
Frame
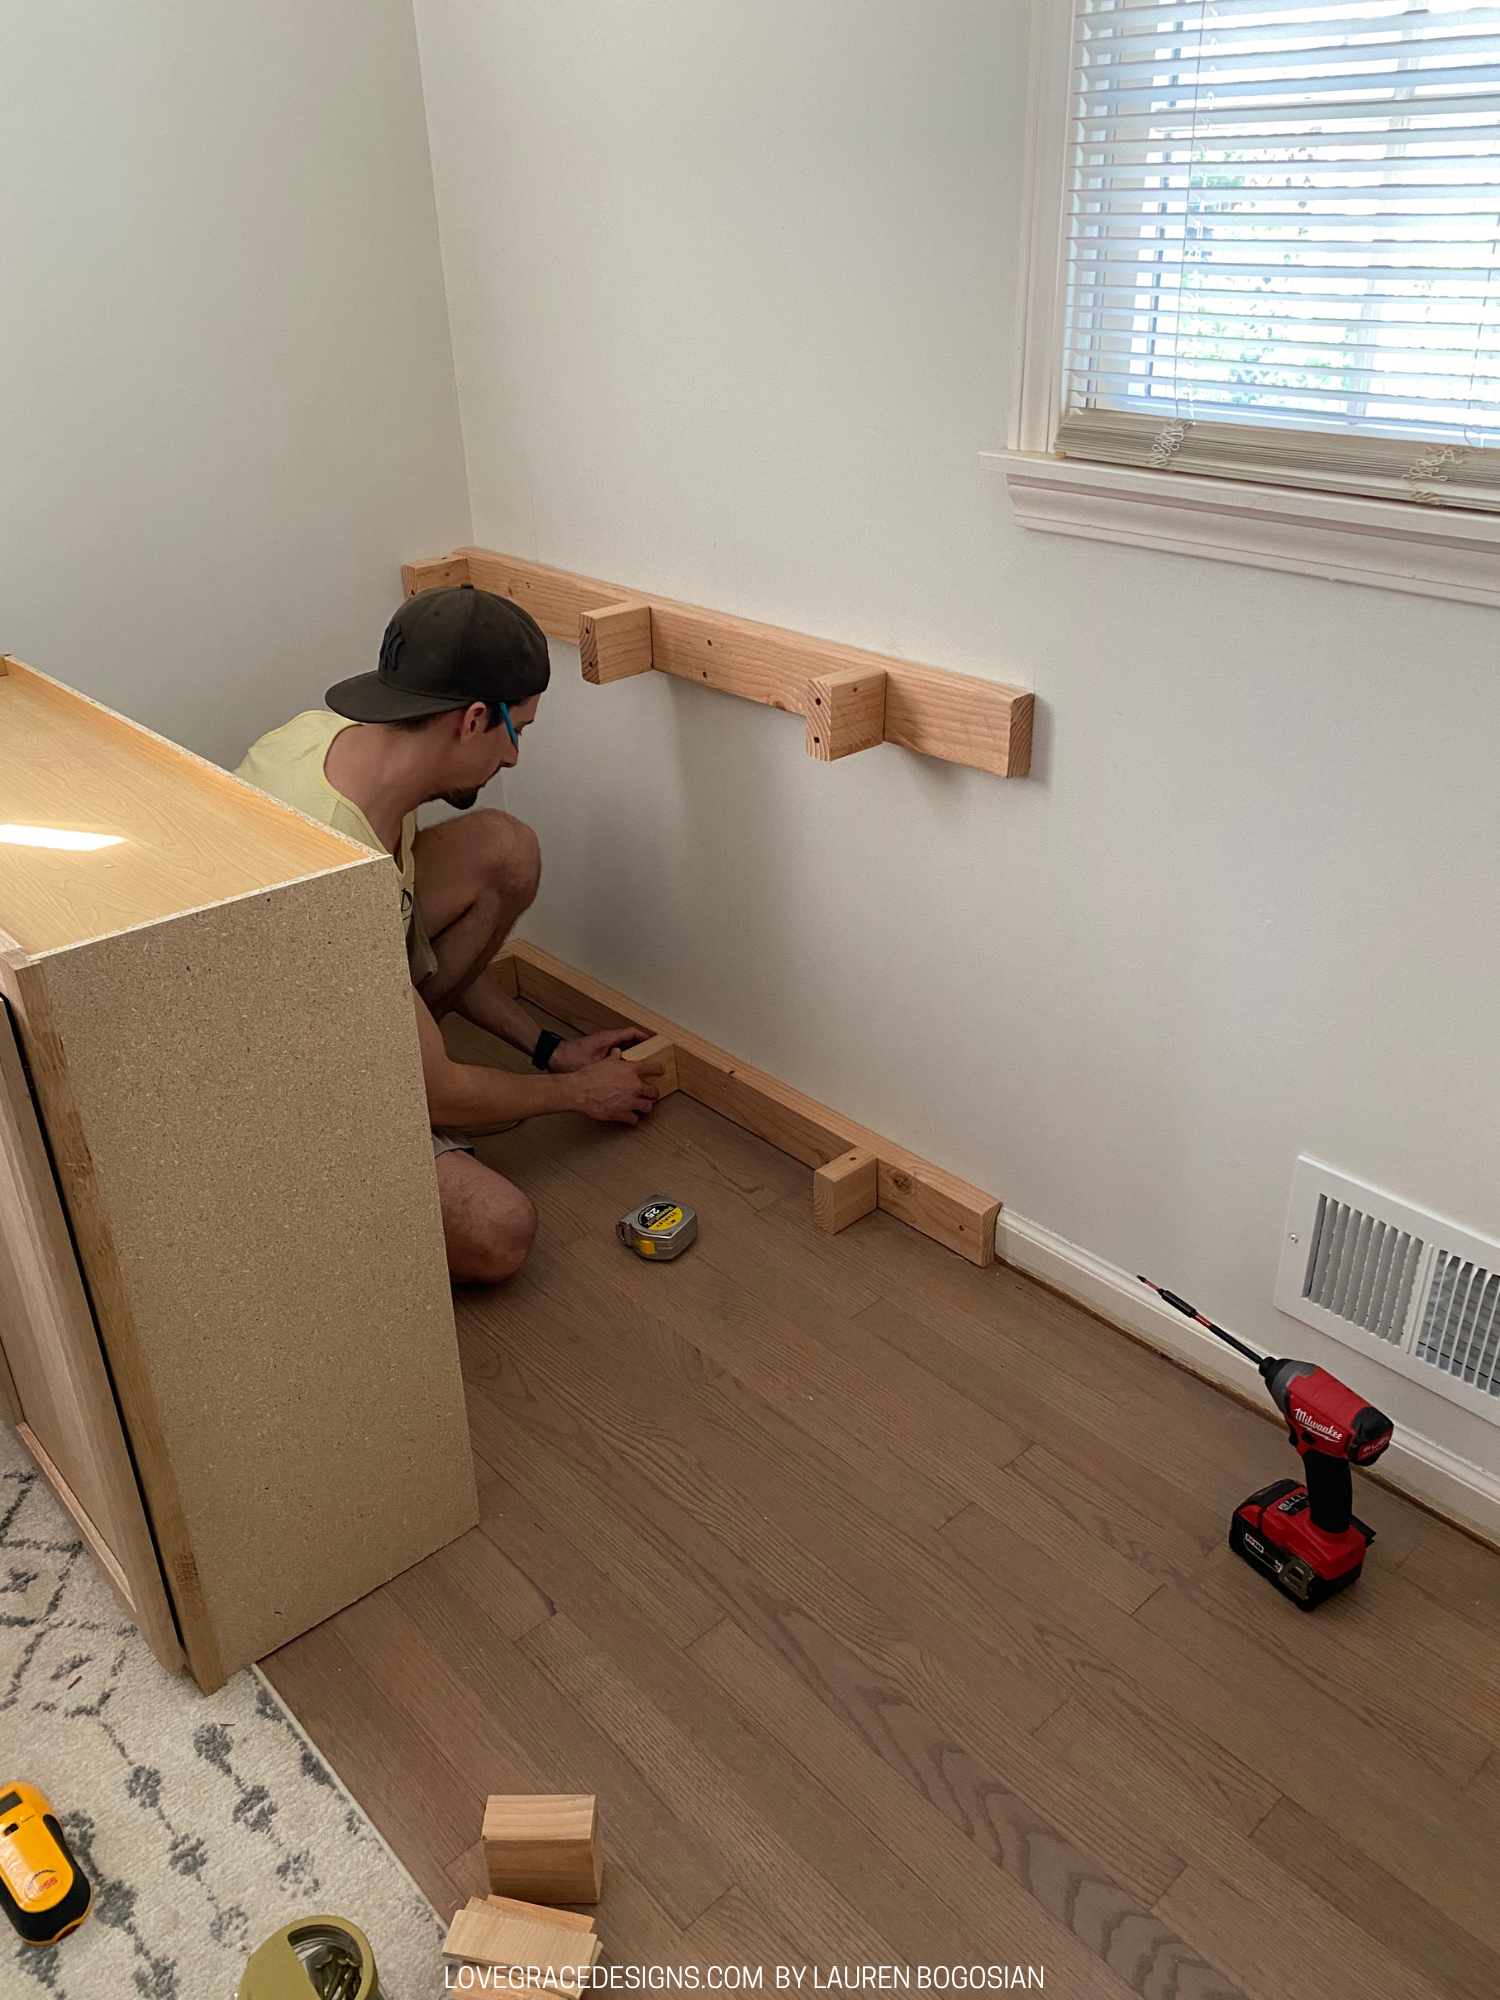
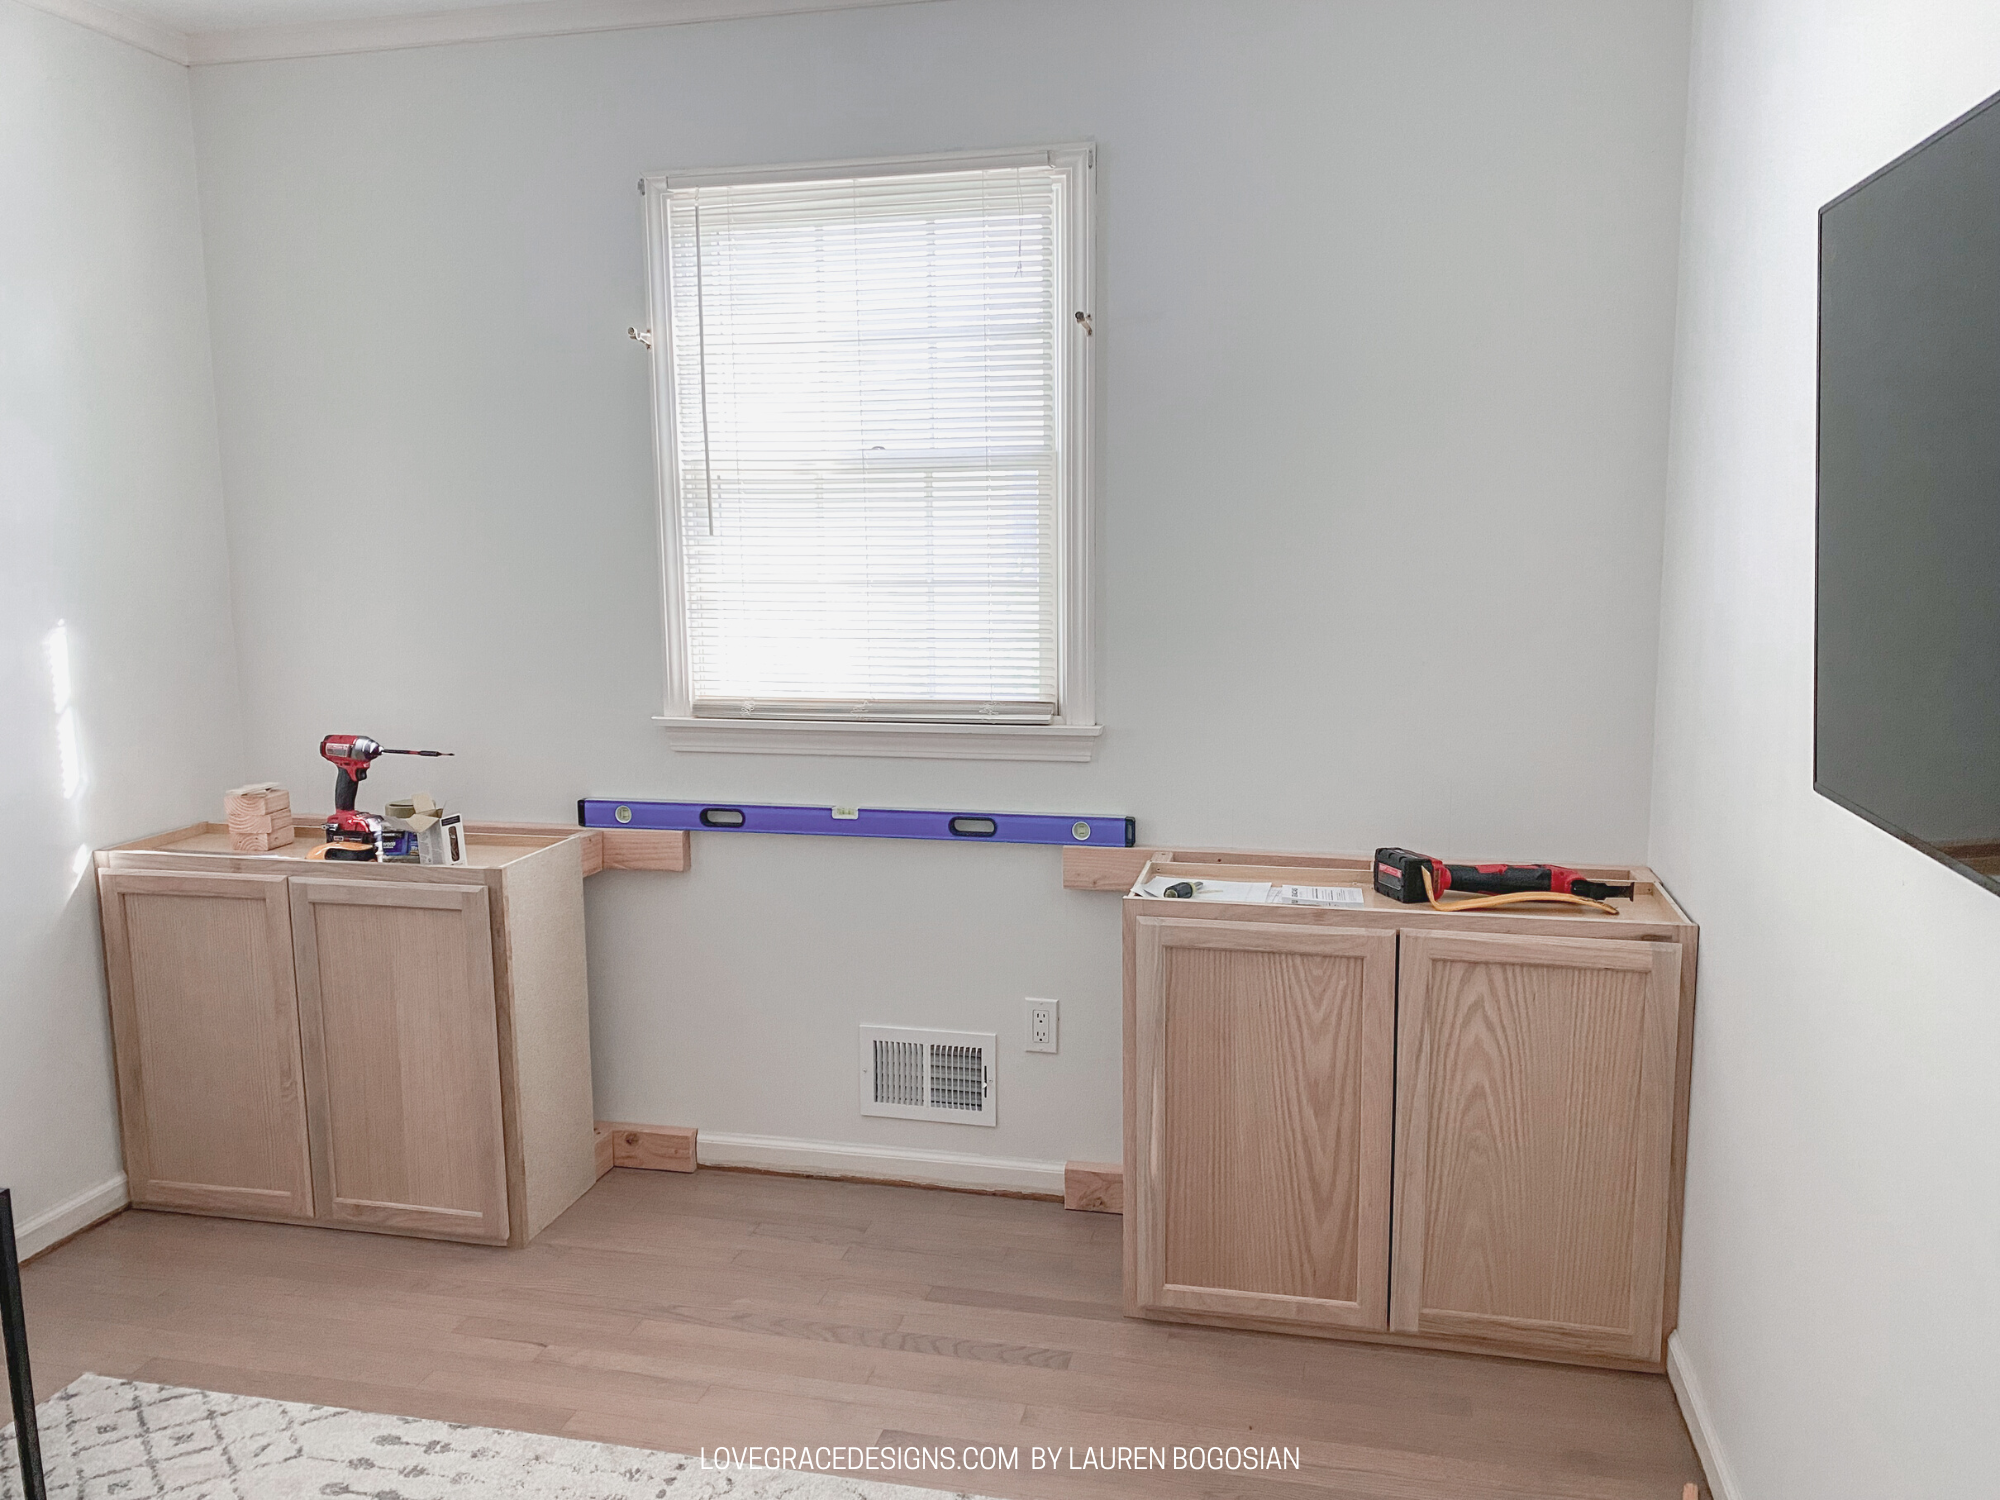
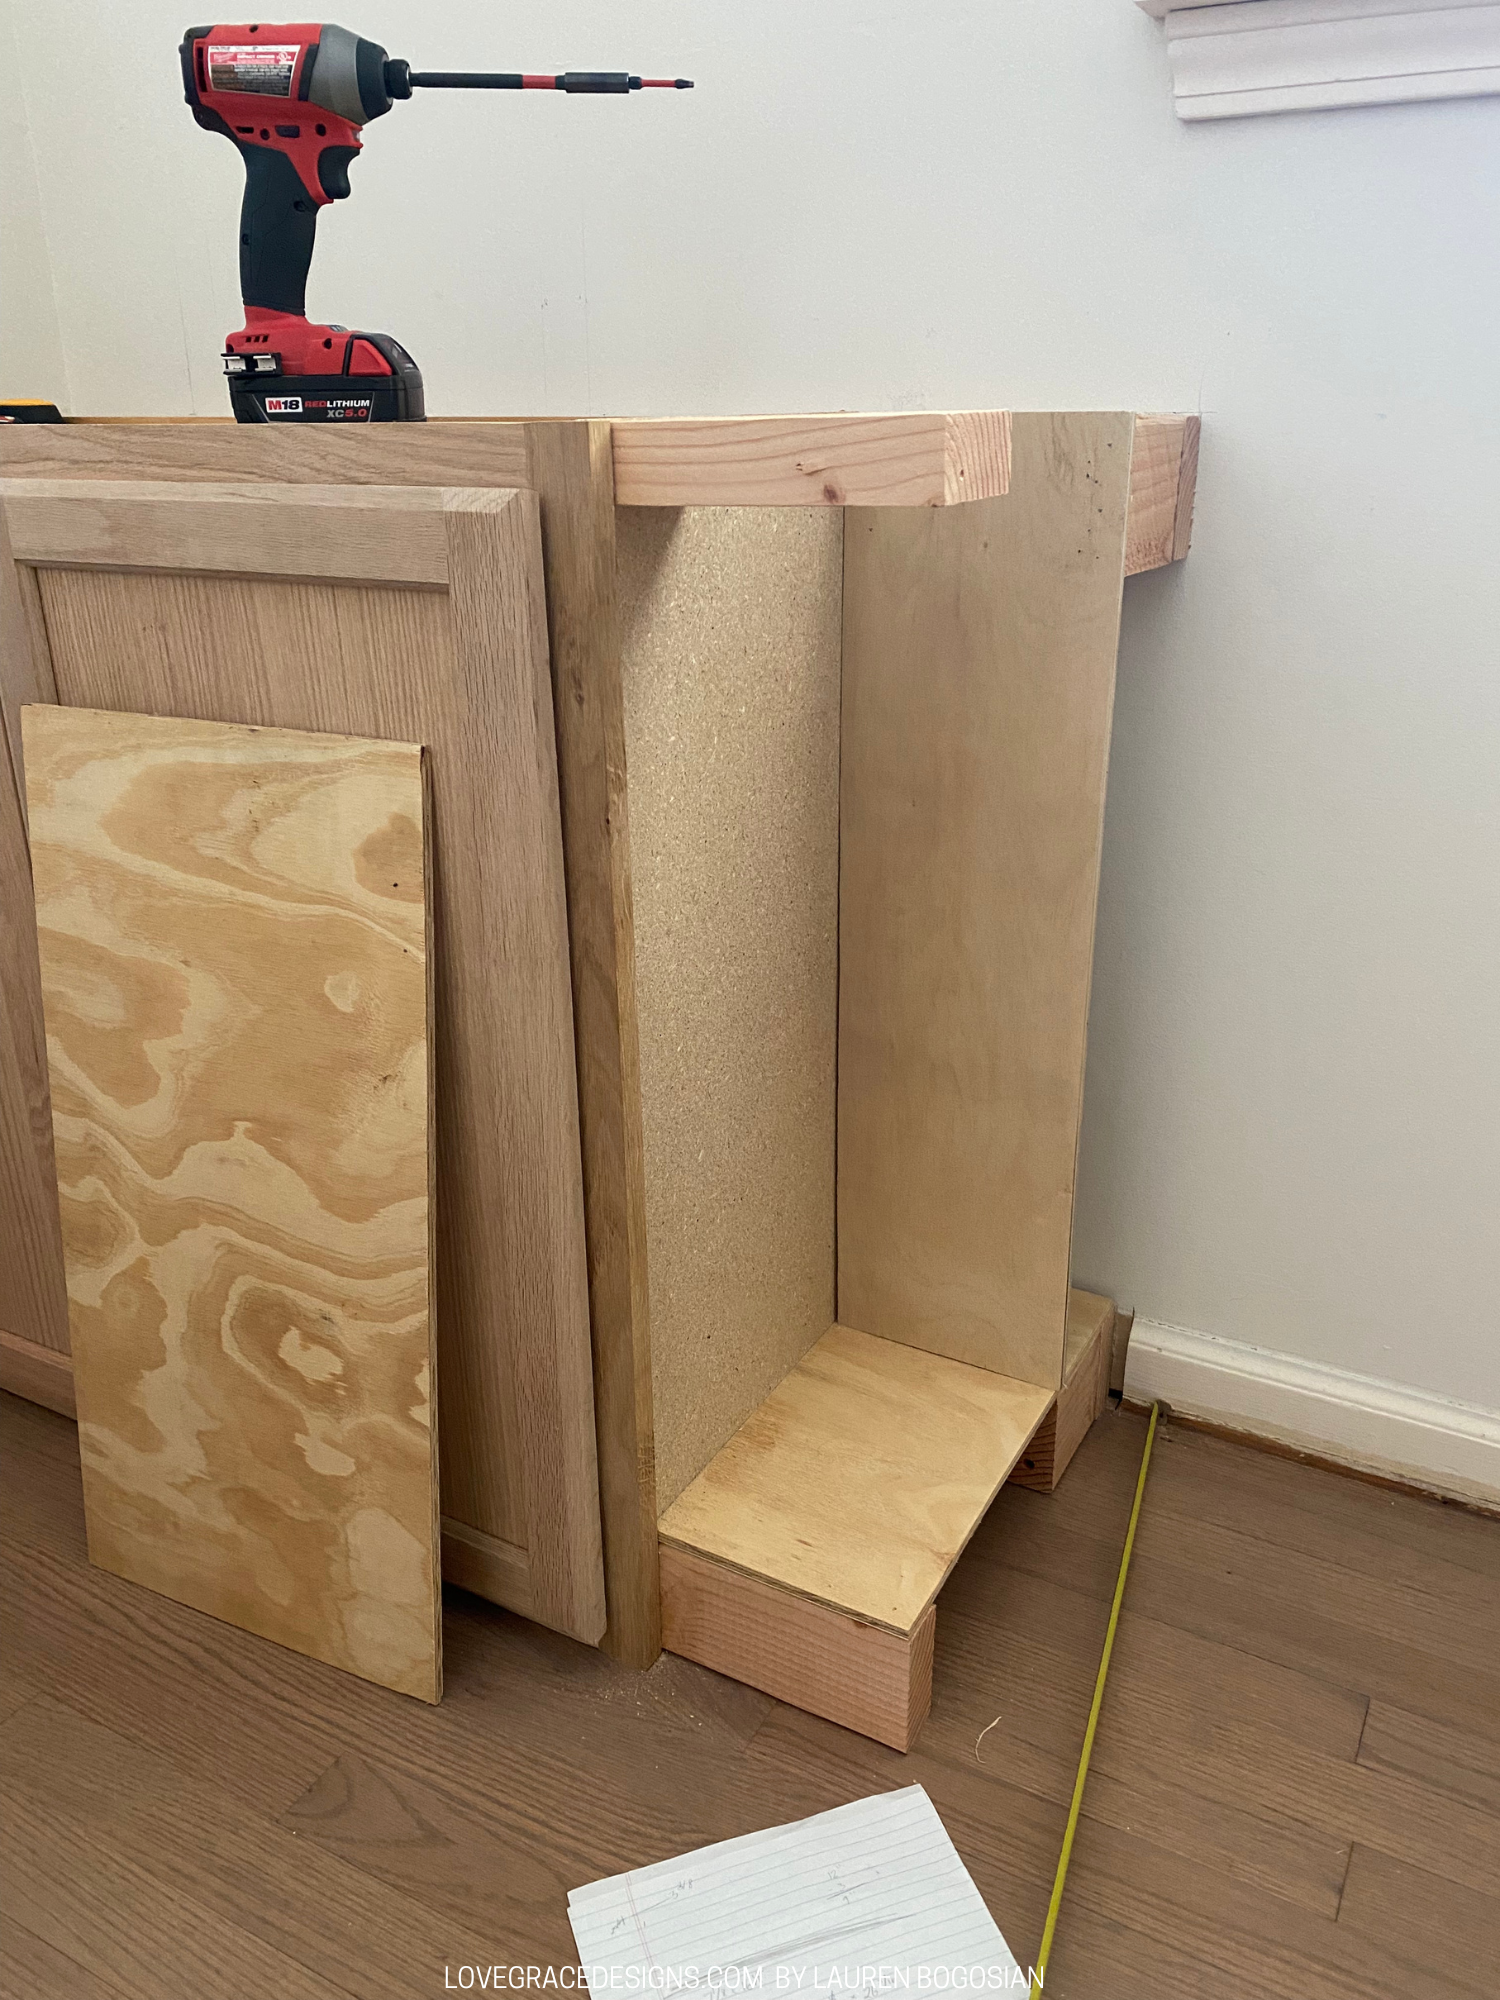
We put the pre-fab cabinets flush to the ground but used 2x4s to box out the back so they were off the wall about 5 inches so the desk top was deep enough to actually work on. We cut and took off the bottom wall trim so we could box out the bottom with a 2x4 flush across the wall on the bottom and the top. The 2x4 went from the corner of the all the way across (43in) where we would build out the mini shelves next to the cabinets so when the cabinets get installed, the 2x4 extends past the cabinets. We then cut 2x4 in about 4 inch blocks and drilled them into the 2x4s about 1 foot apart from each other. We drilled in 3 at the top and 3 at the bottom on each side.
Installing the Cabinets
I based the lower built-ins off of getting pre-fab cabinets from Home Depot or Lowes. Home Depot wound up having what we needed in stock so we went with them…we also had some gift cards so that helped! We used the Hamptons Bay upper cabinets but the stock we got were just recalled for possibly falling off the wall…since we are using them on the ground it doesn’t pertain to us but just a note that you may want to get other cabinets. I linked some other options that could work.
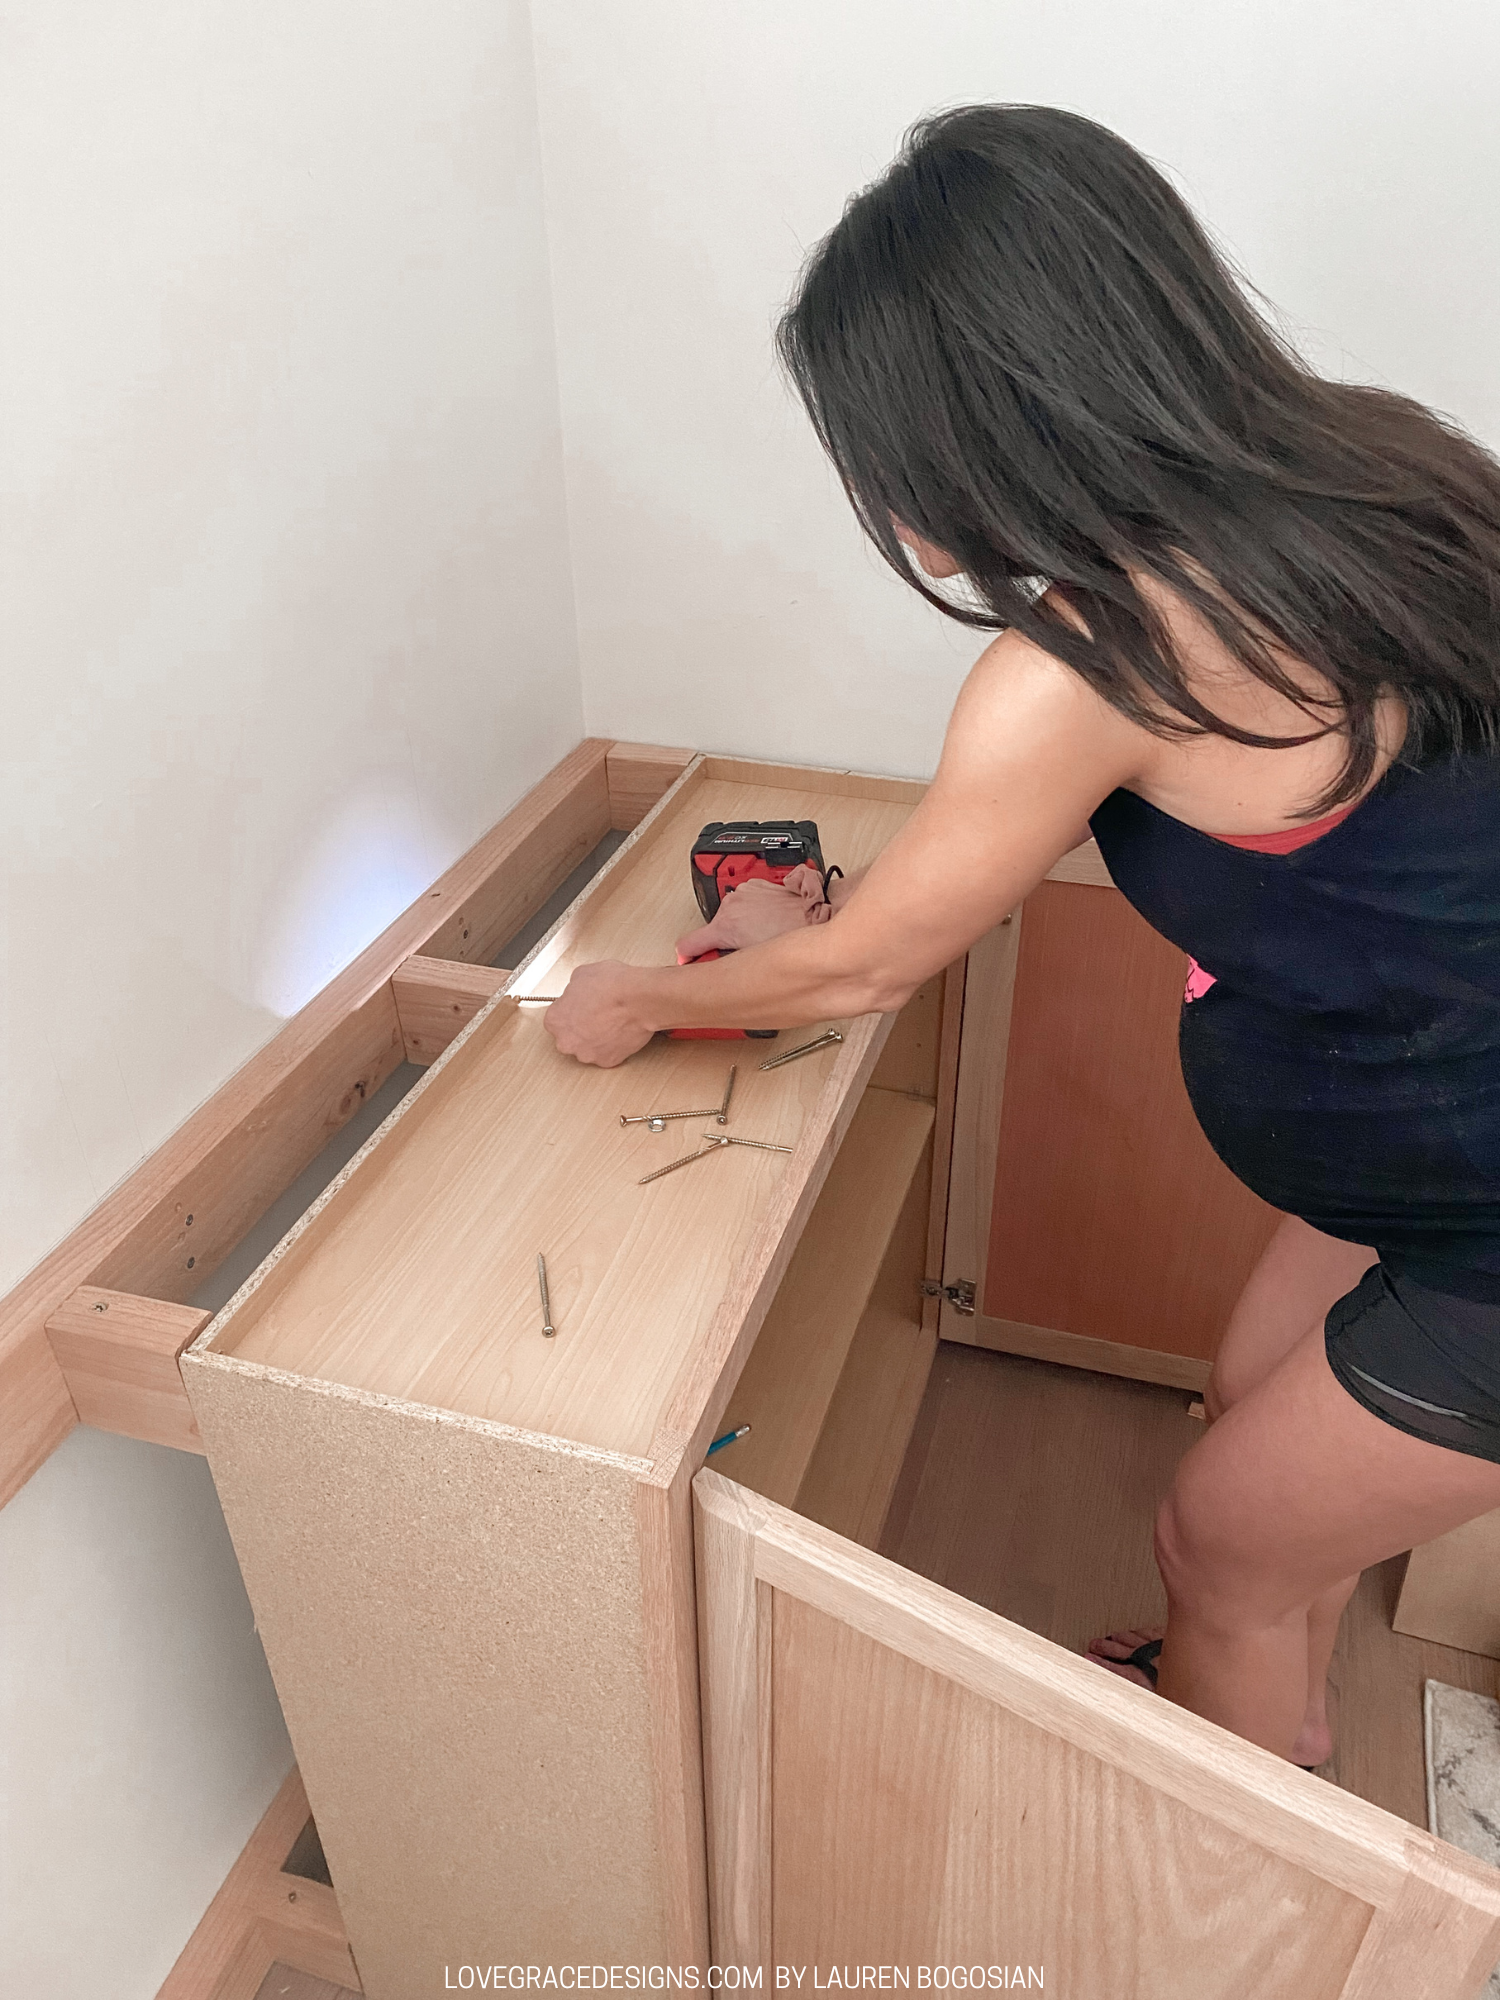
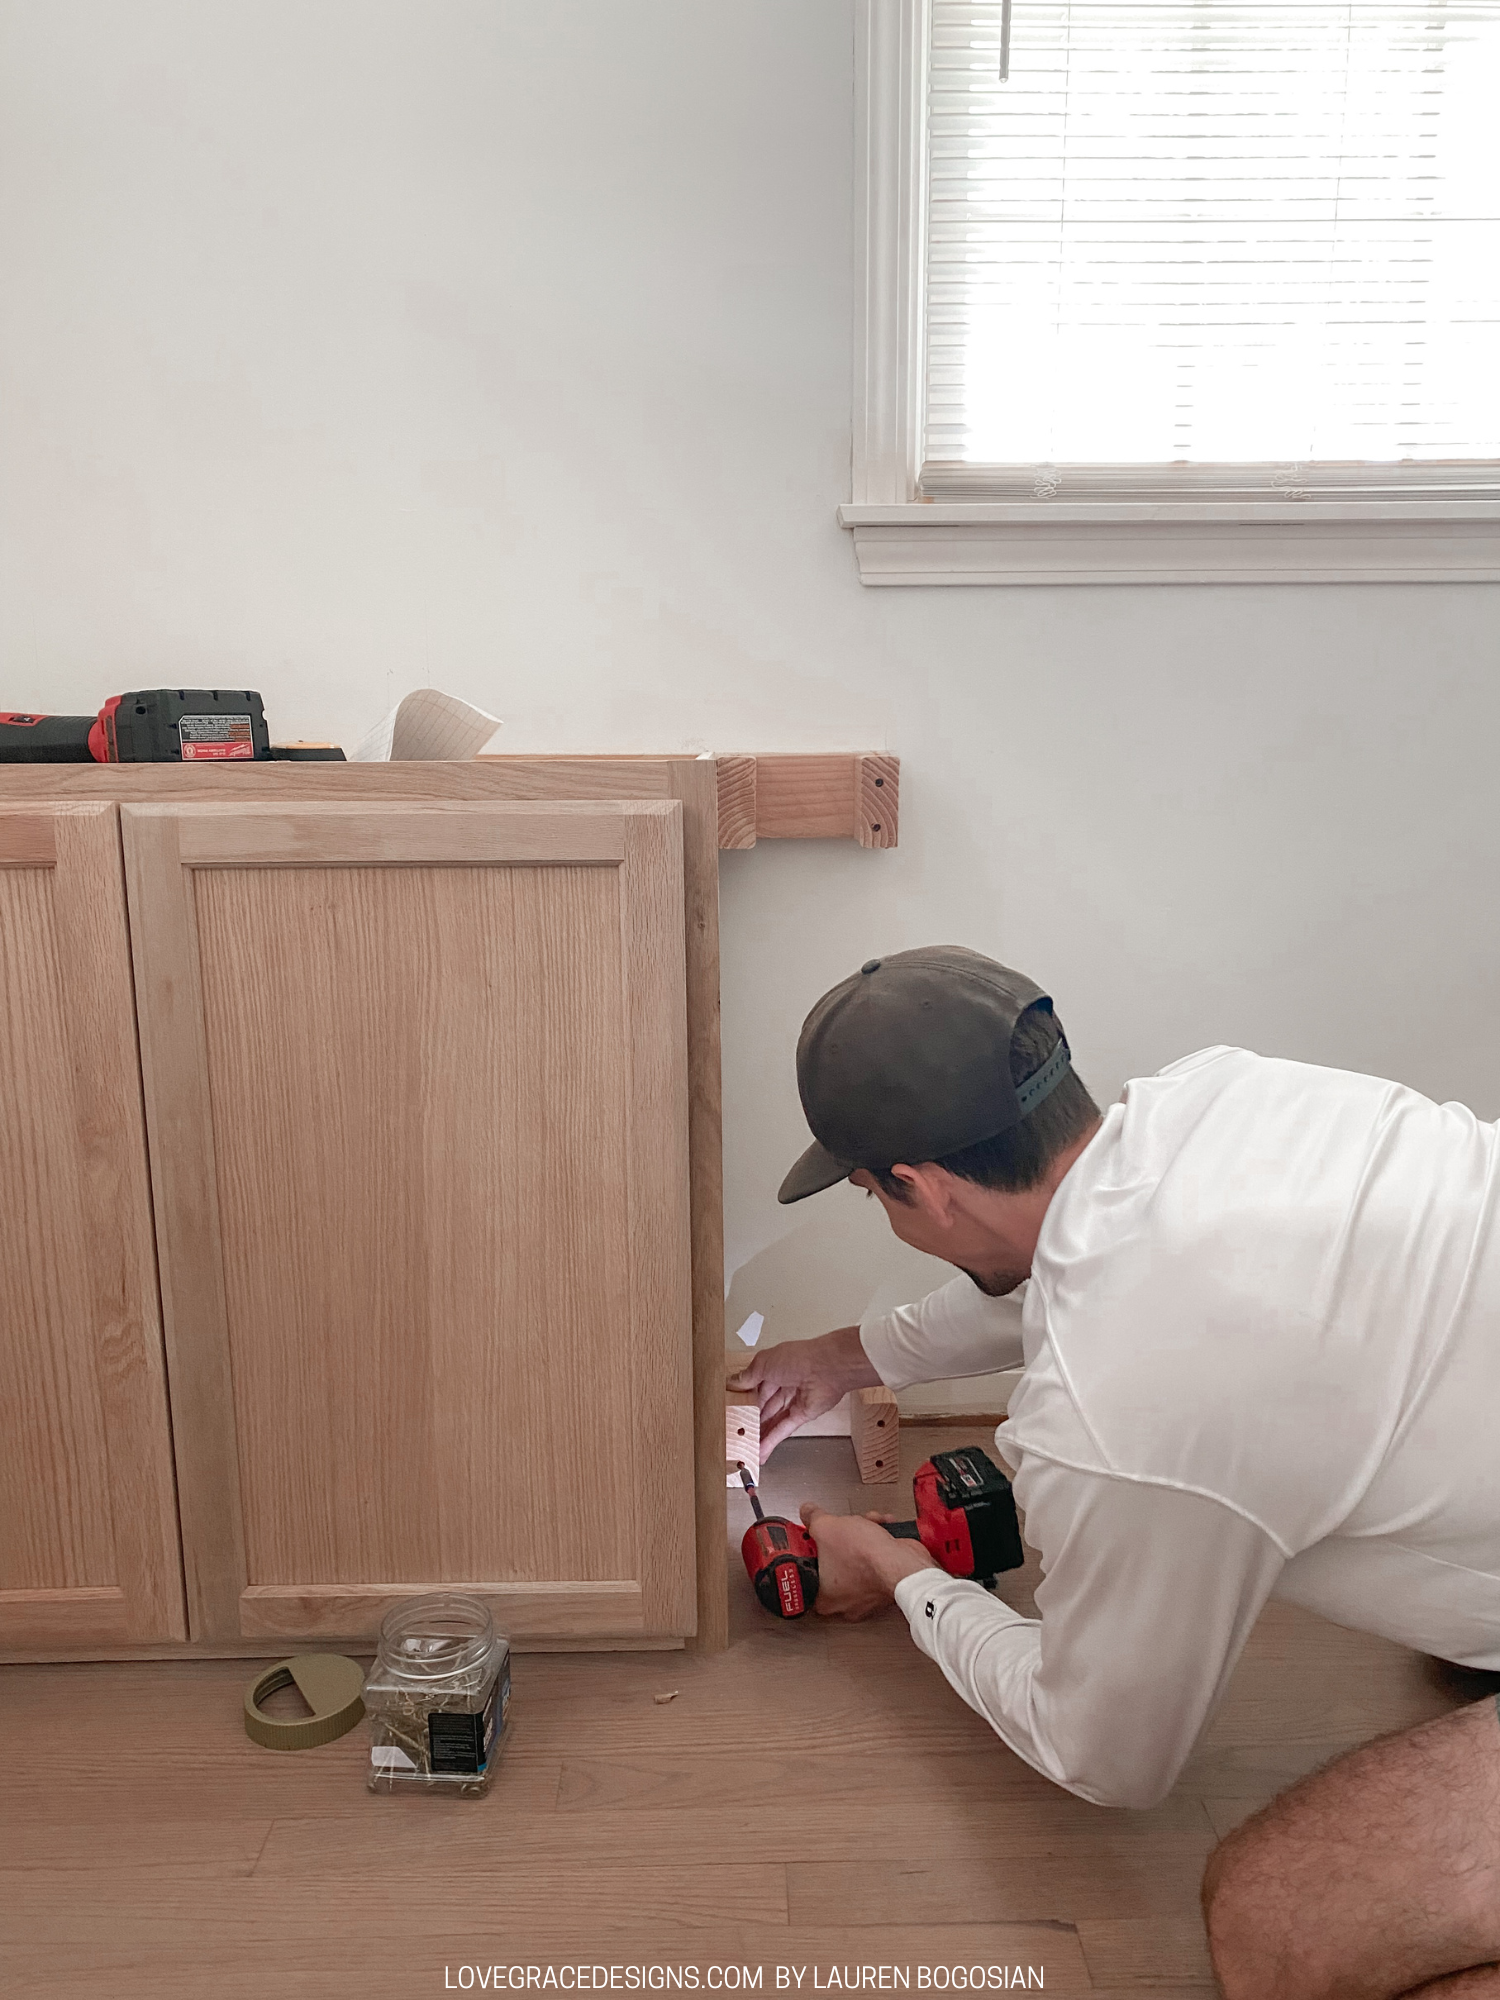
Once that frame was installed, we drilled the pre-fab cabinets to the 2x4 frame. We drilled the top portion of the pre-fab cabinets to the top 2x4 frame and inside the cabinets to the bottom 2x4 frame and the side wall. The installation wasn’t bad since we had the frame to drill directly into and only needed to find one stud on each wall for the sides.
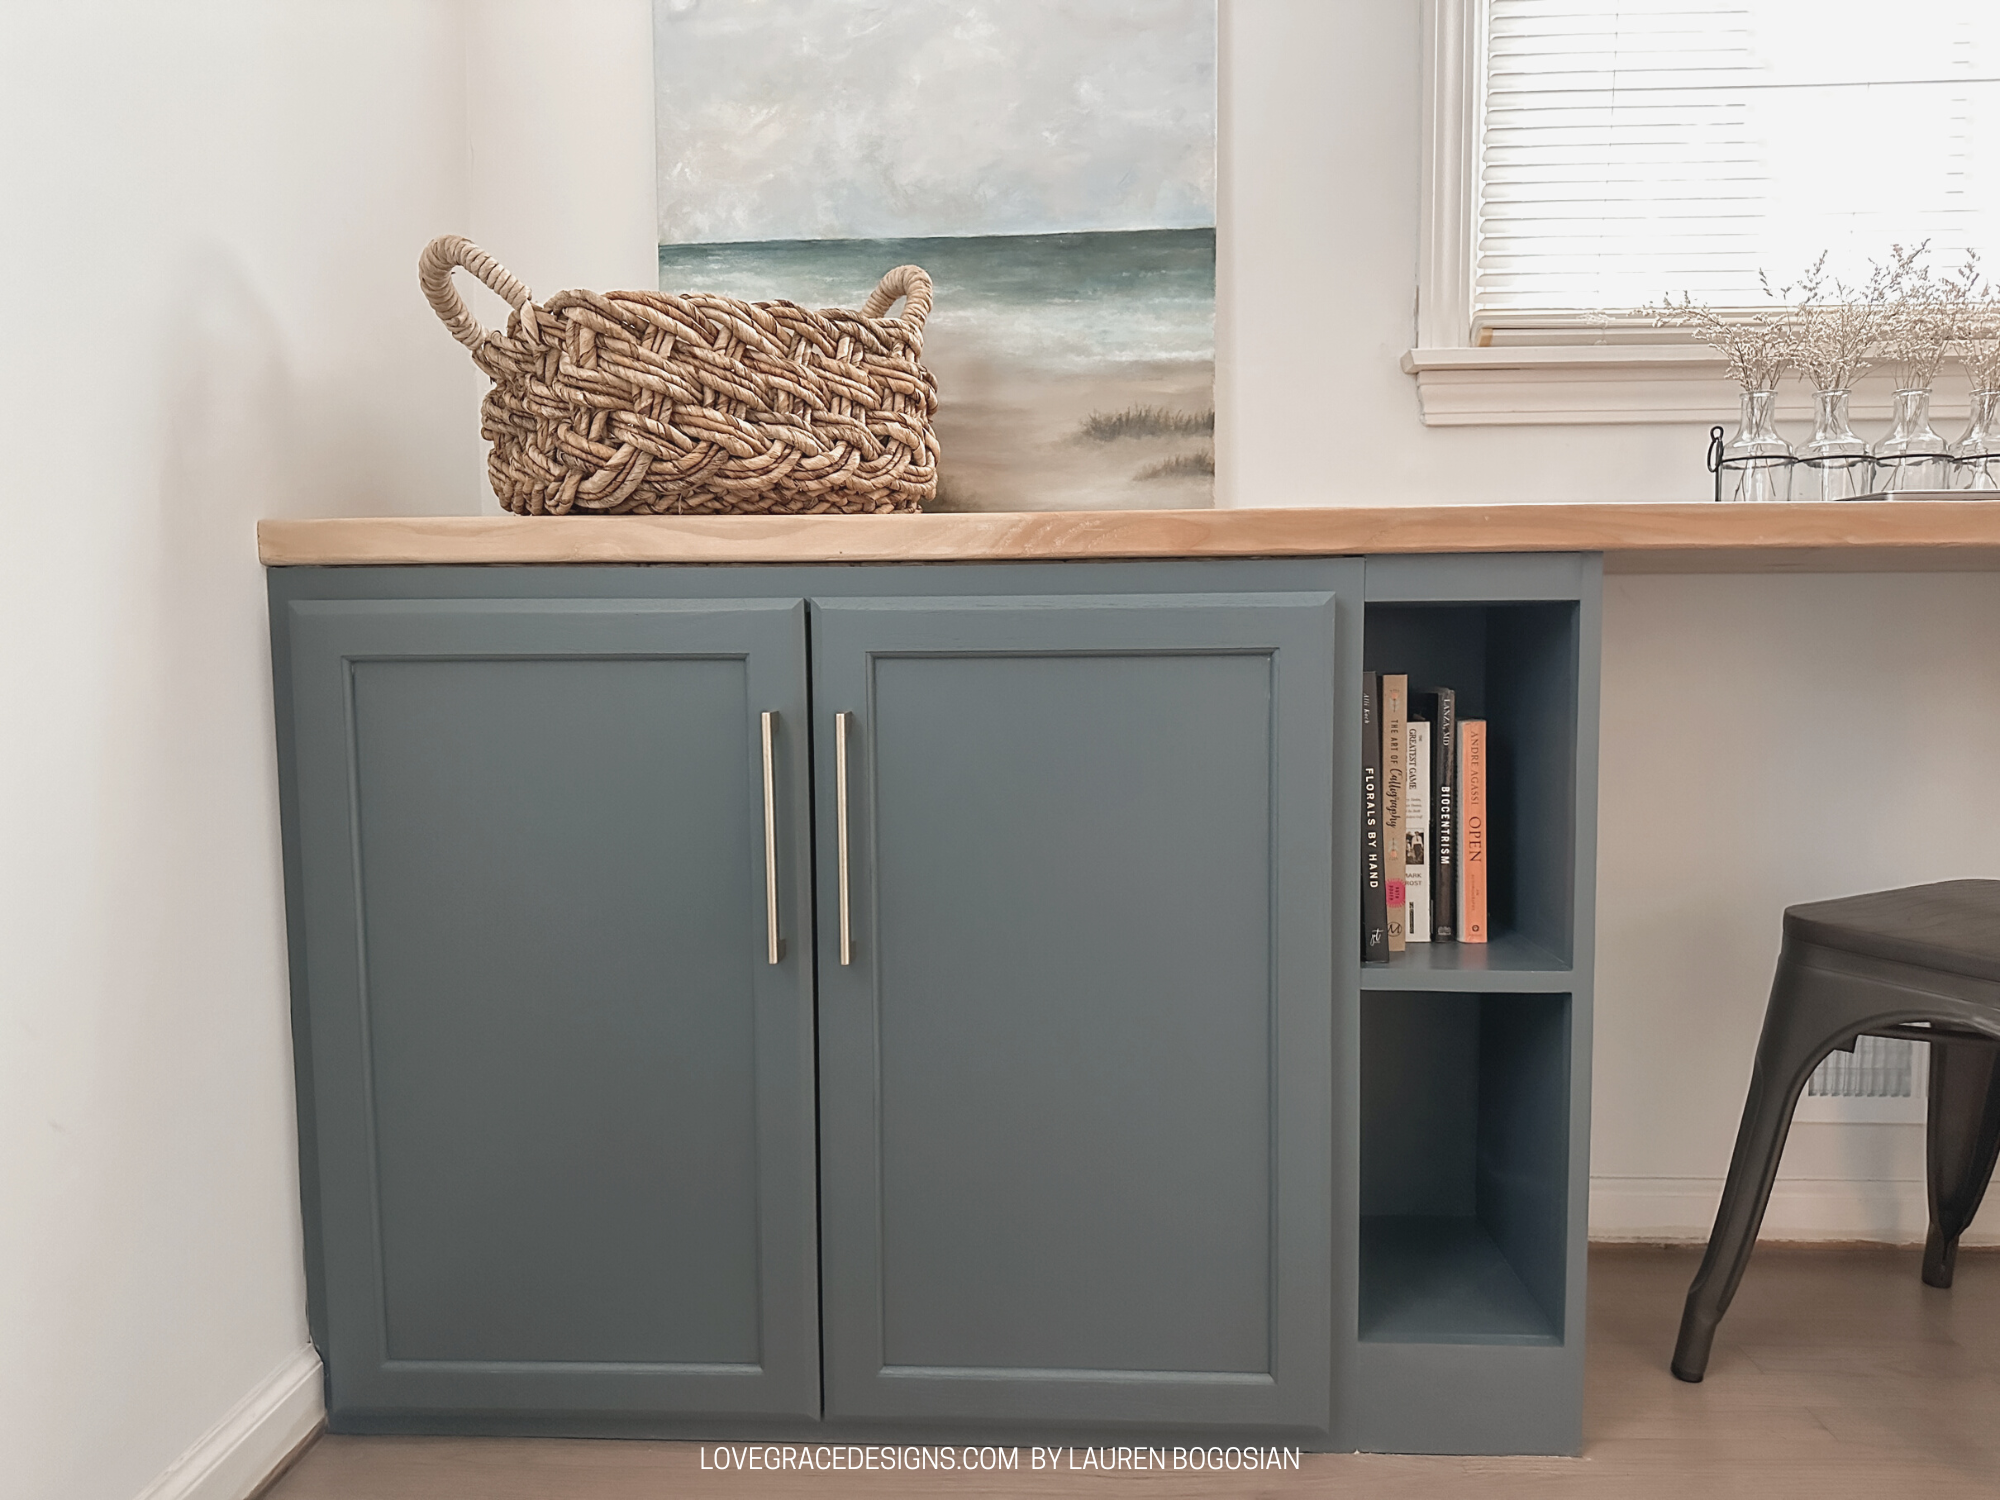
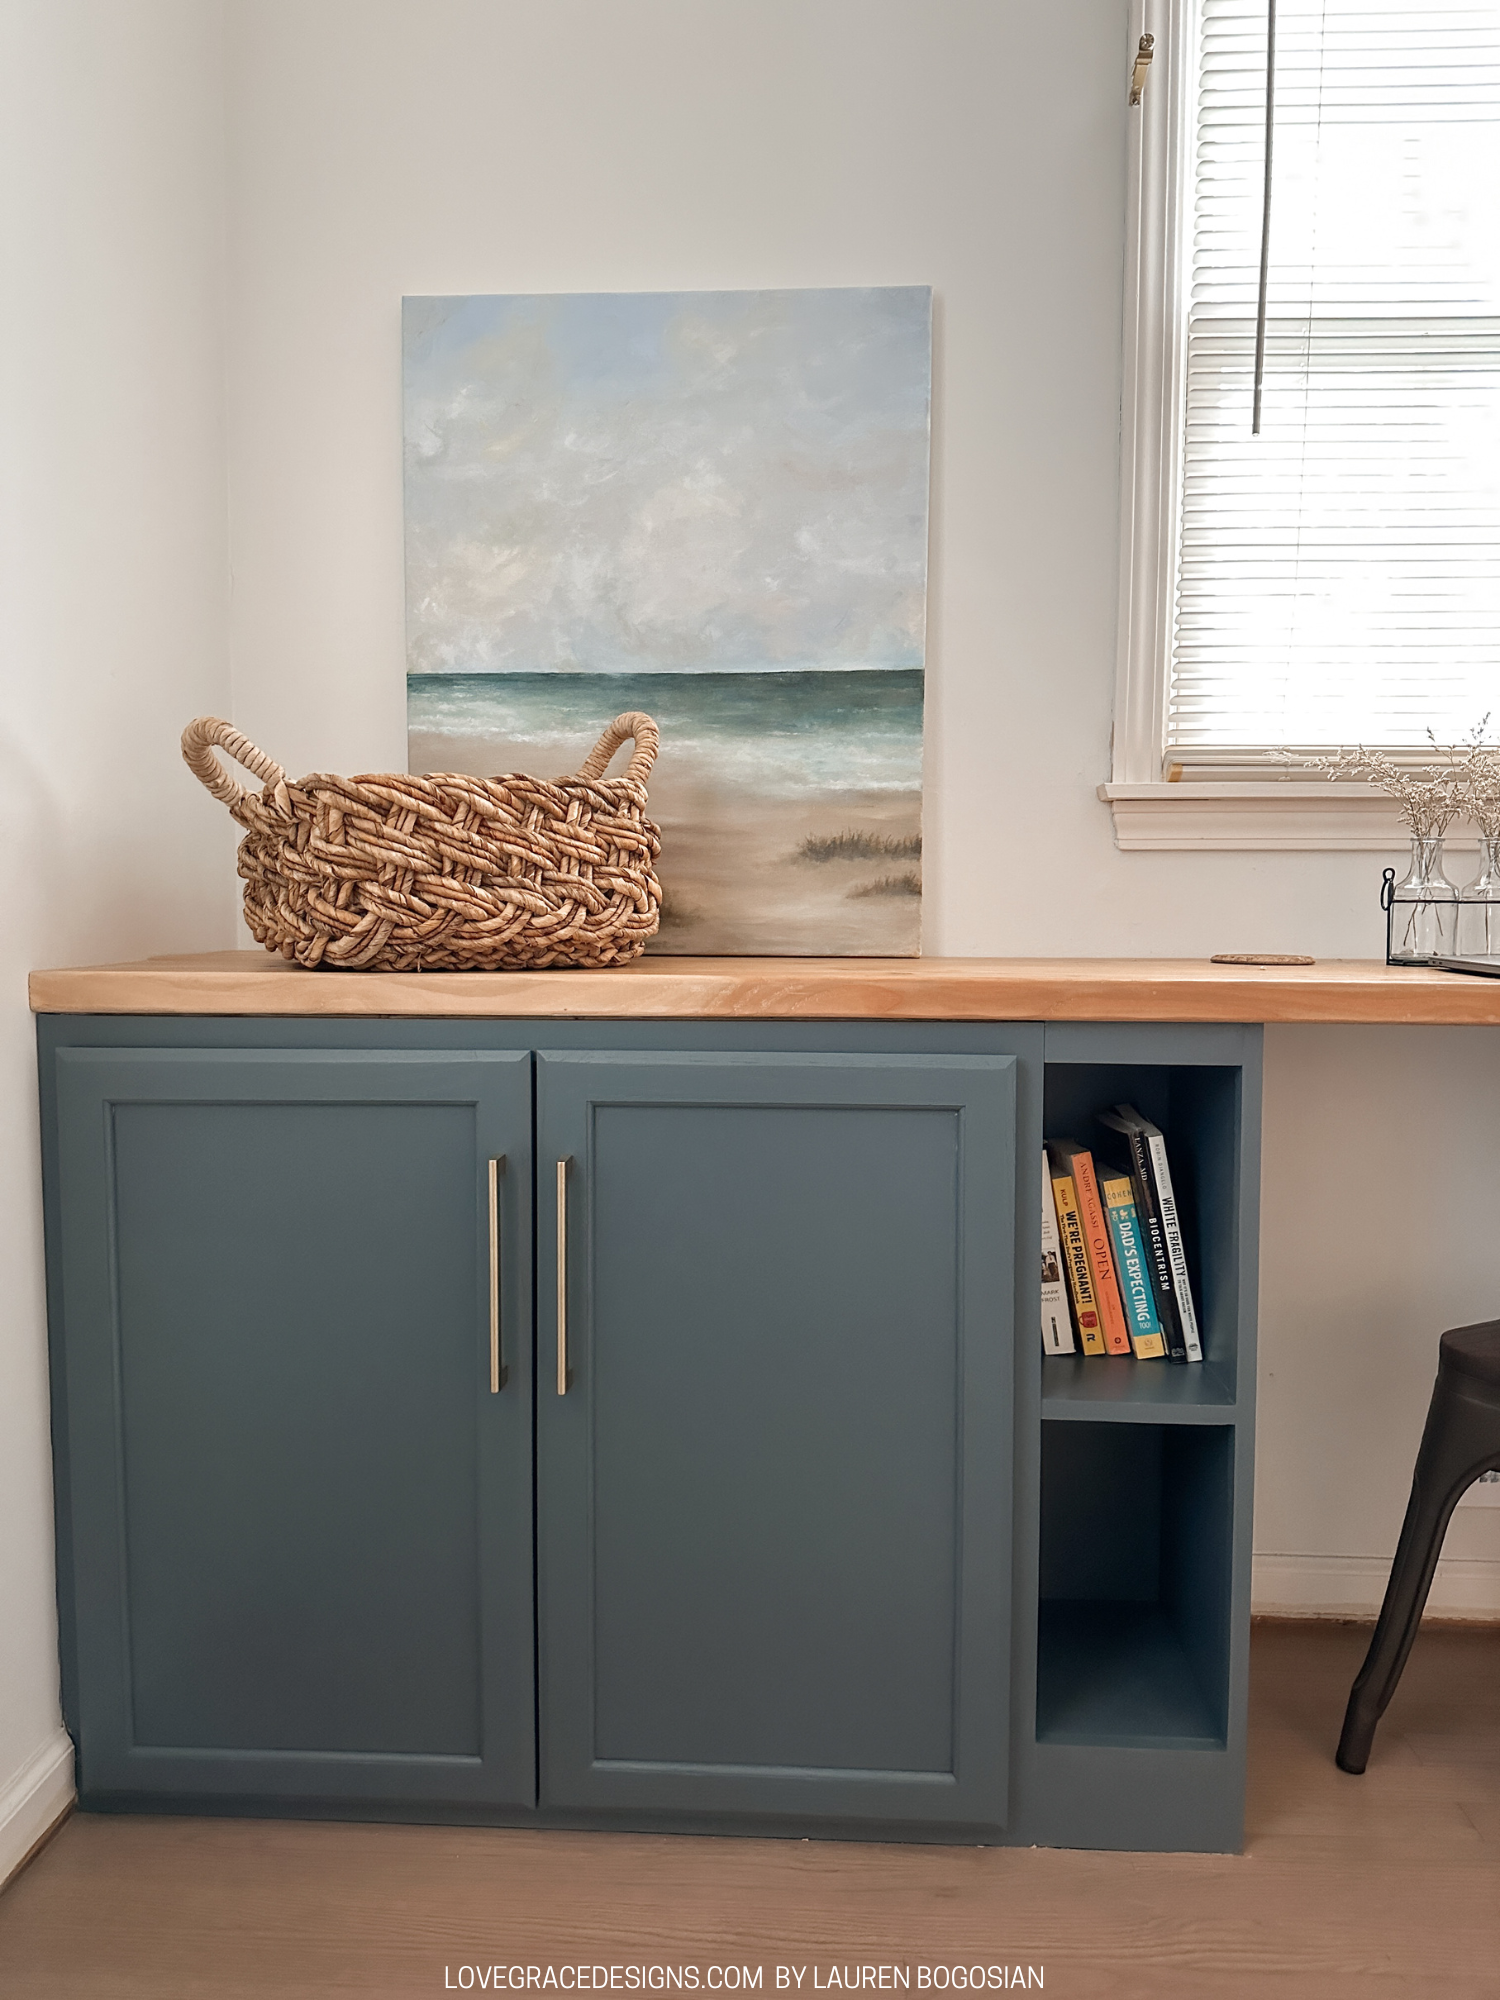
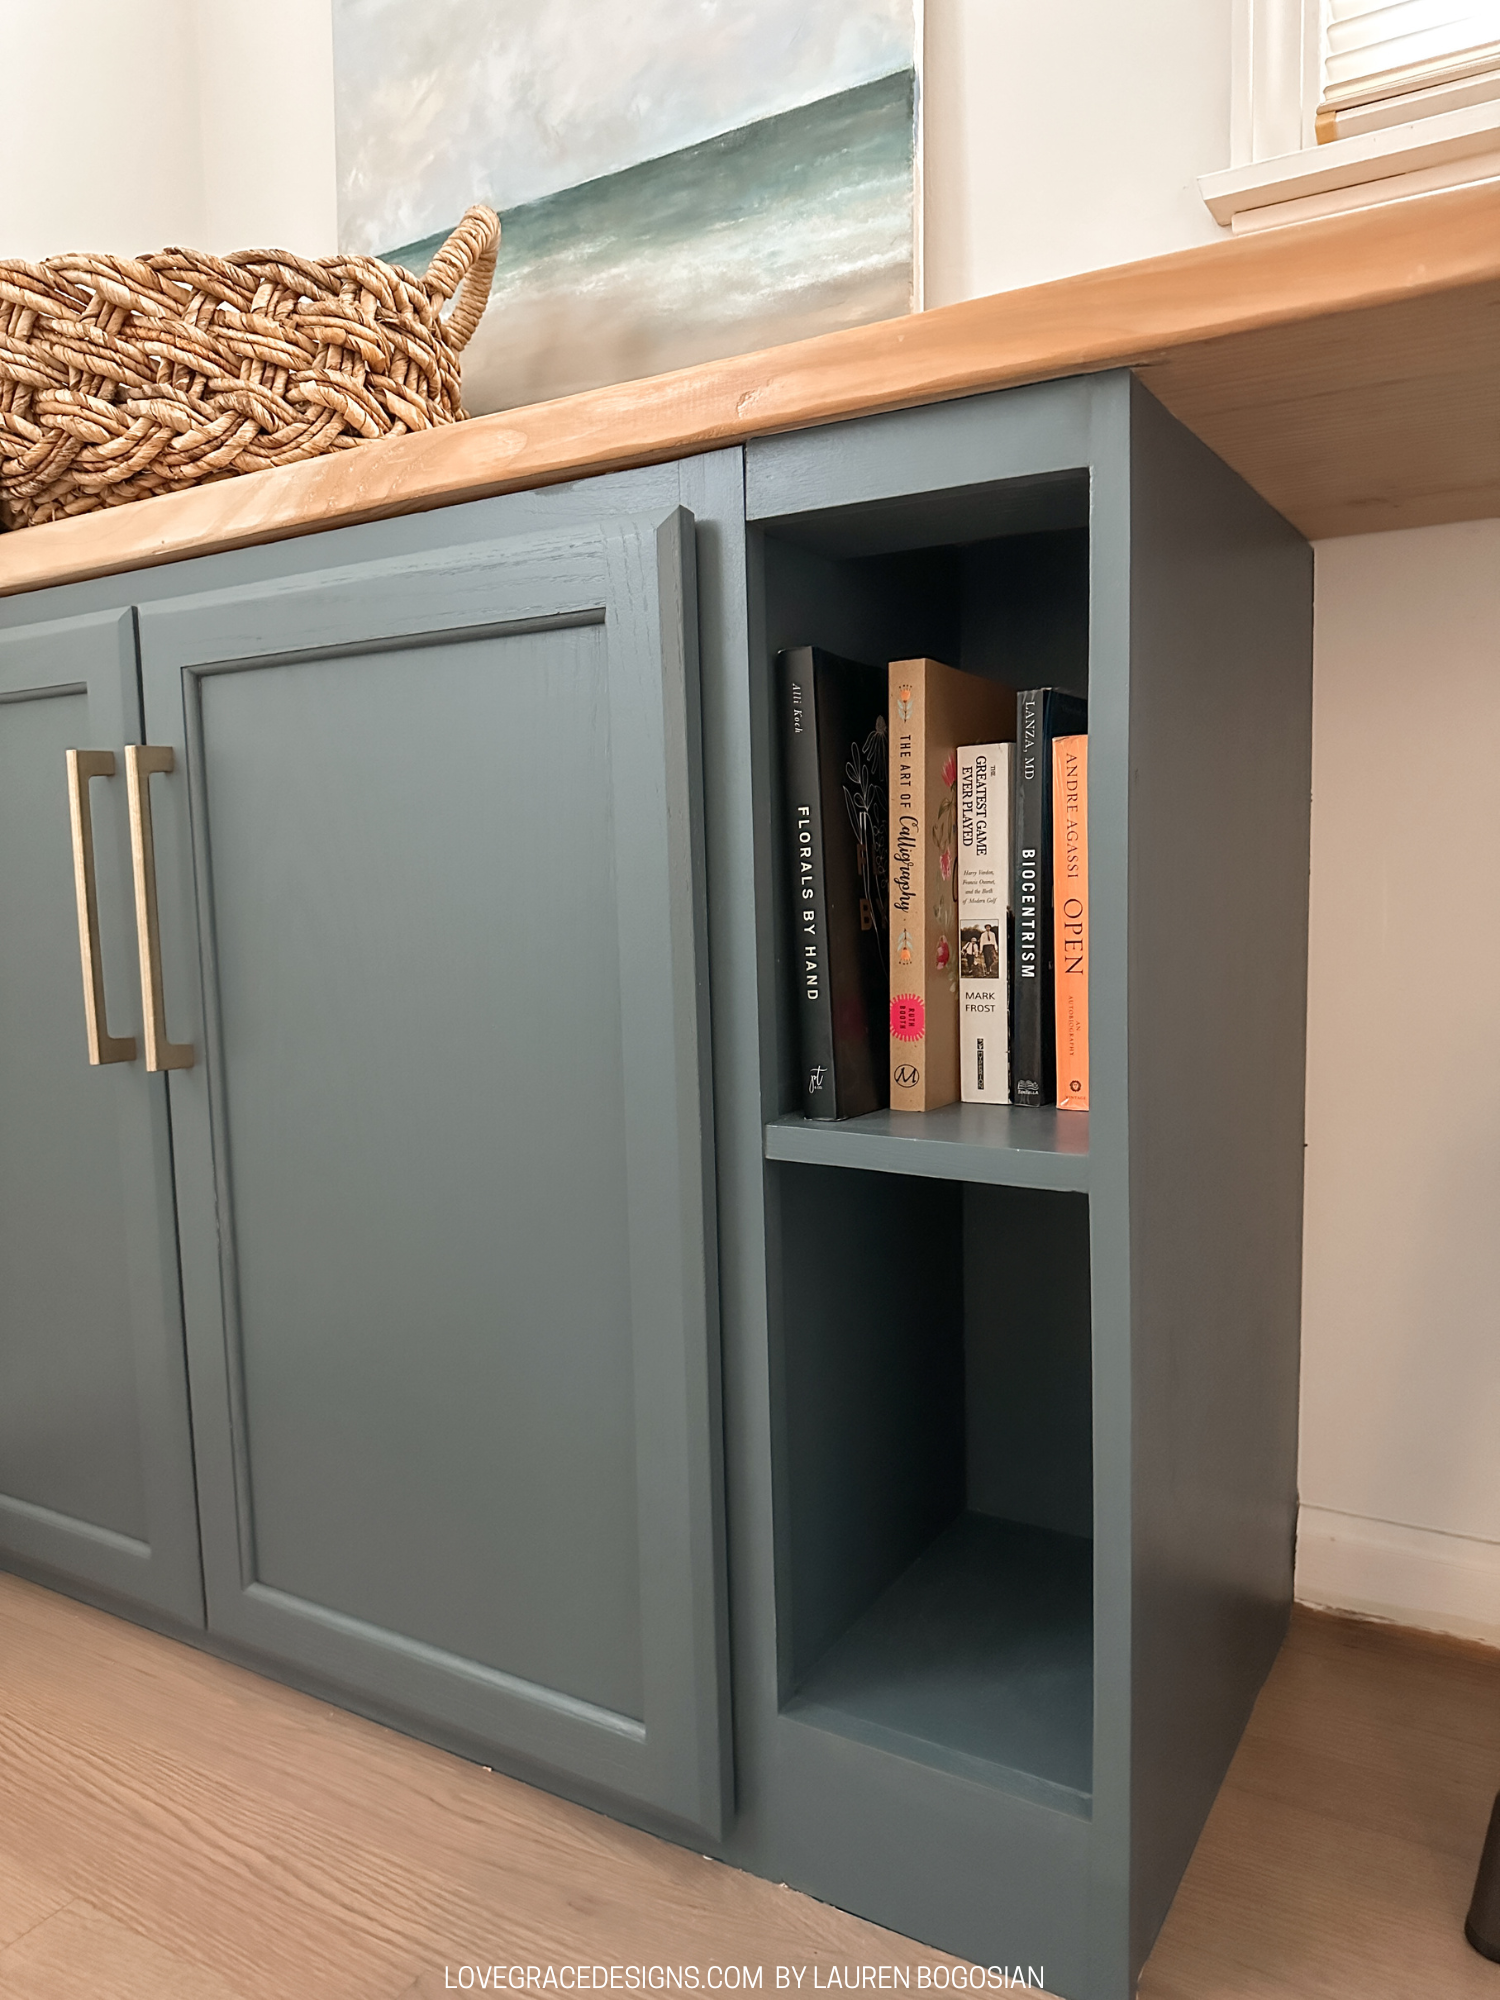
Building the Custom Side Shelves
When I sketched the built-ins, I had an idea to add a skinny bookshelf to the side of each cabinet. I’m so happy with how the look of this turned out and how much more ‘custom’ it makes the lower built-ins. I will say that this is the part that made the process go sooo much slower. Adding these made us have to measure everything so meticulously. Finding trim to finish it off was also a battle and I randomly found a piece of molding in Home Depot that worked perfectly! If we do something like this again, we’d base our measurements off basic wood measurements that are easily available rather than extra custom sizing.
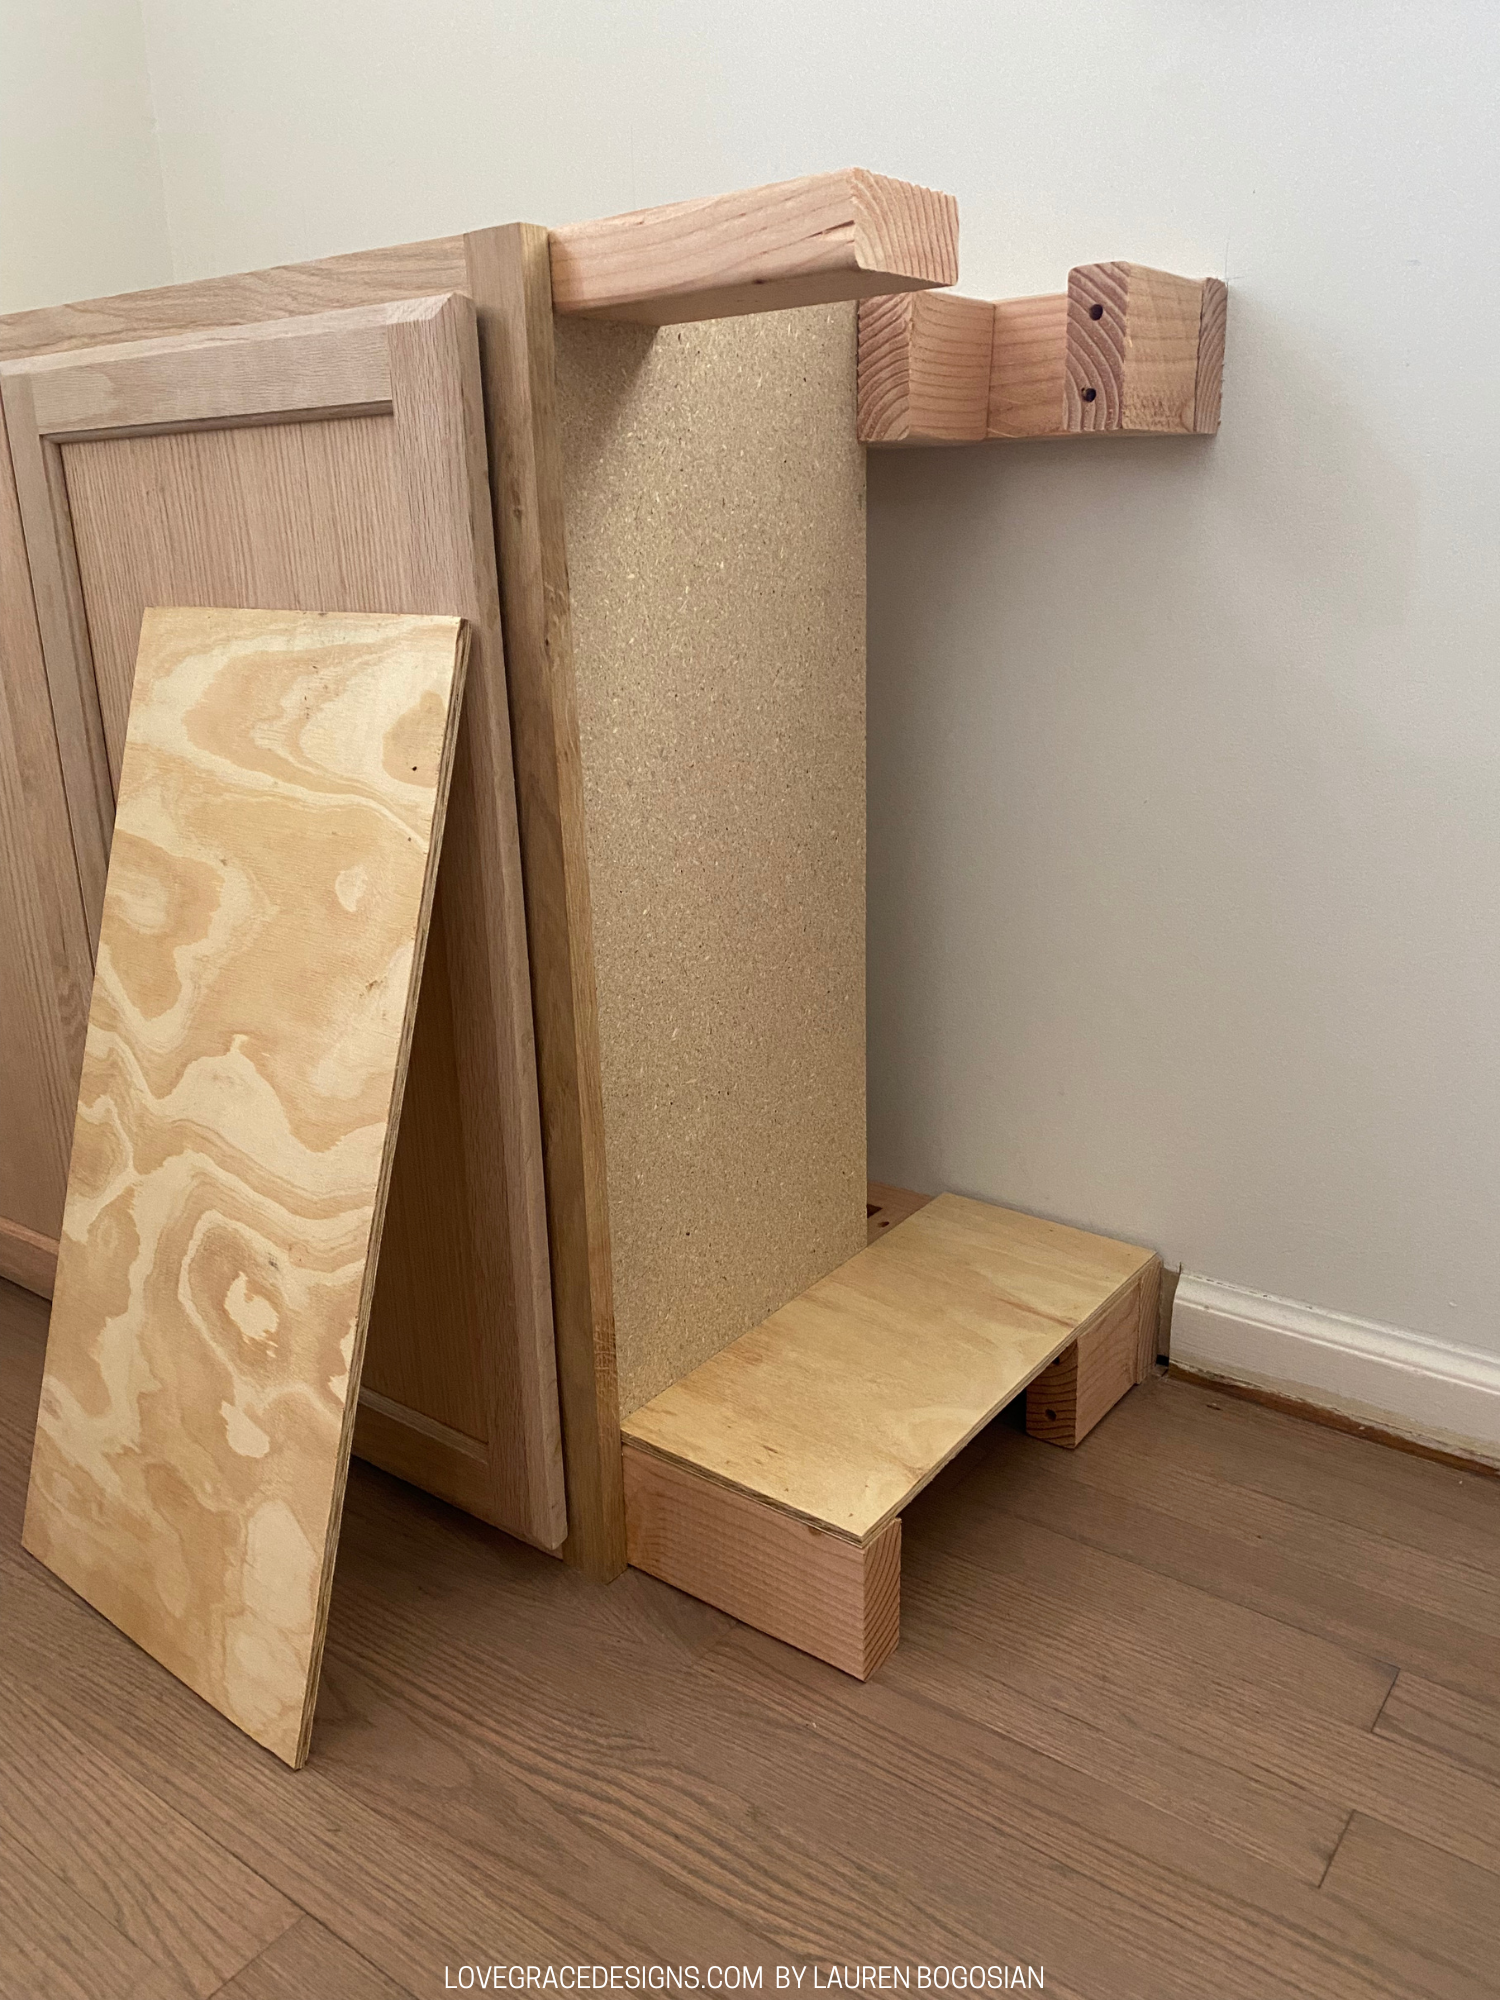
After both cabinets were drilled to the frame, we then framed out the side bookshelves. The bookshelves are both 7in wide and used ¾ plywood to frame the side, bottom, and shelf. We screwed another piece of the 2x4 to the front side of the pre-frab cabinet on the top and the bottom. Using a nail gun, we nailed the bottom plywood directly into the 2x4 frame. We nailed the side piece to finish the frame of the shelf and that is where we stopped for a while since Graham was born and we just didn’t have the time to tediously work on customizing the shelf for a while.
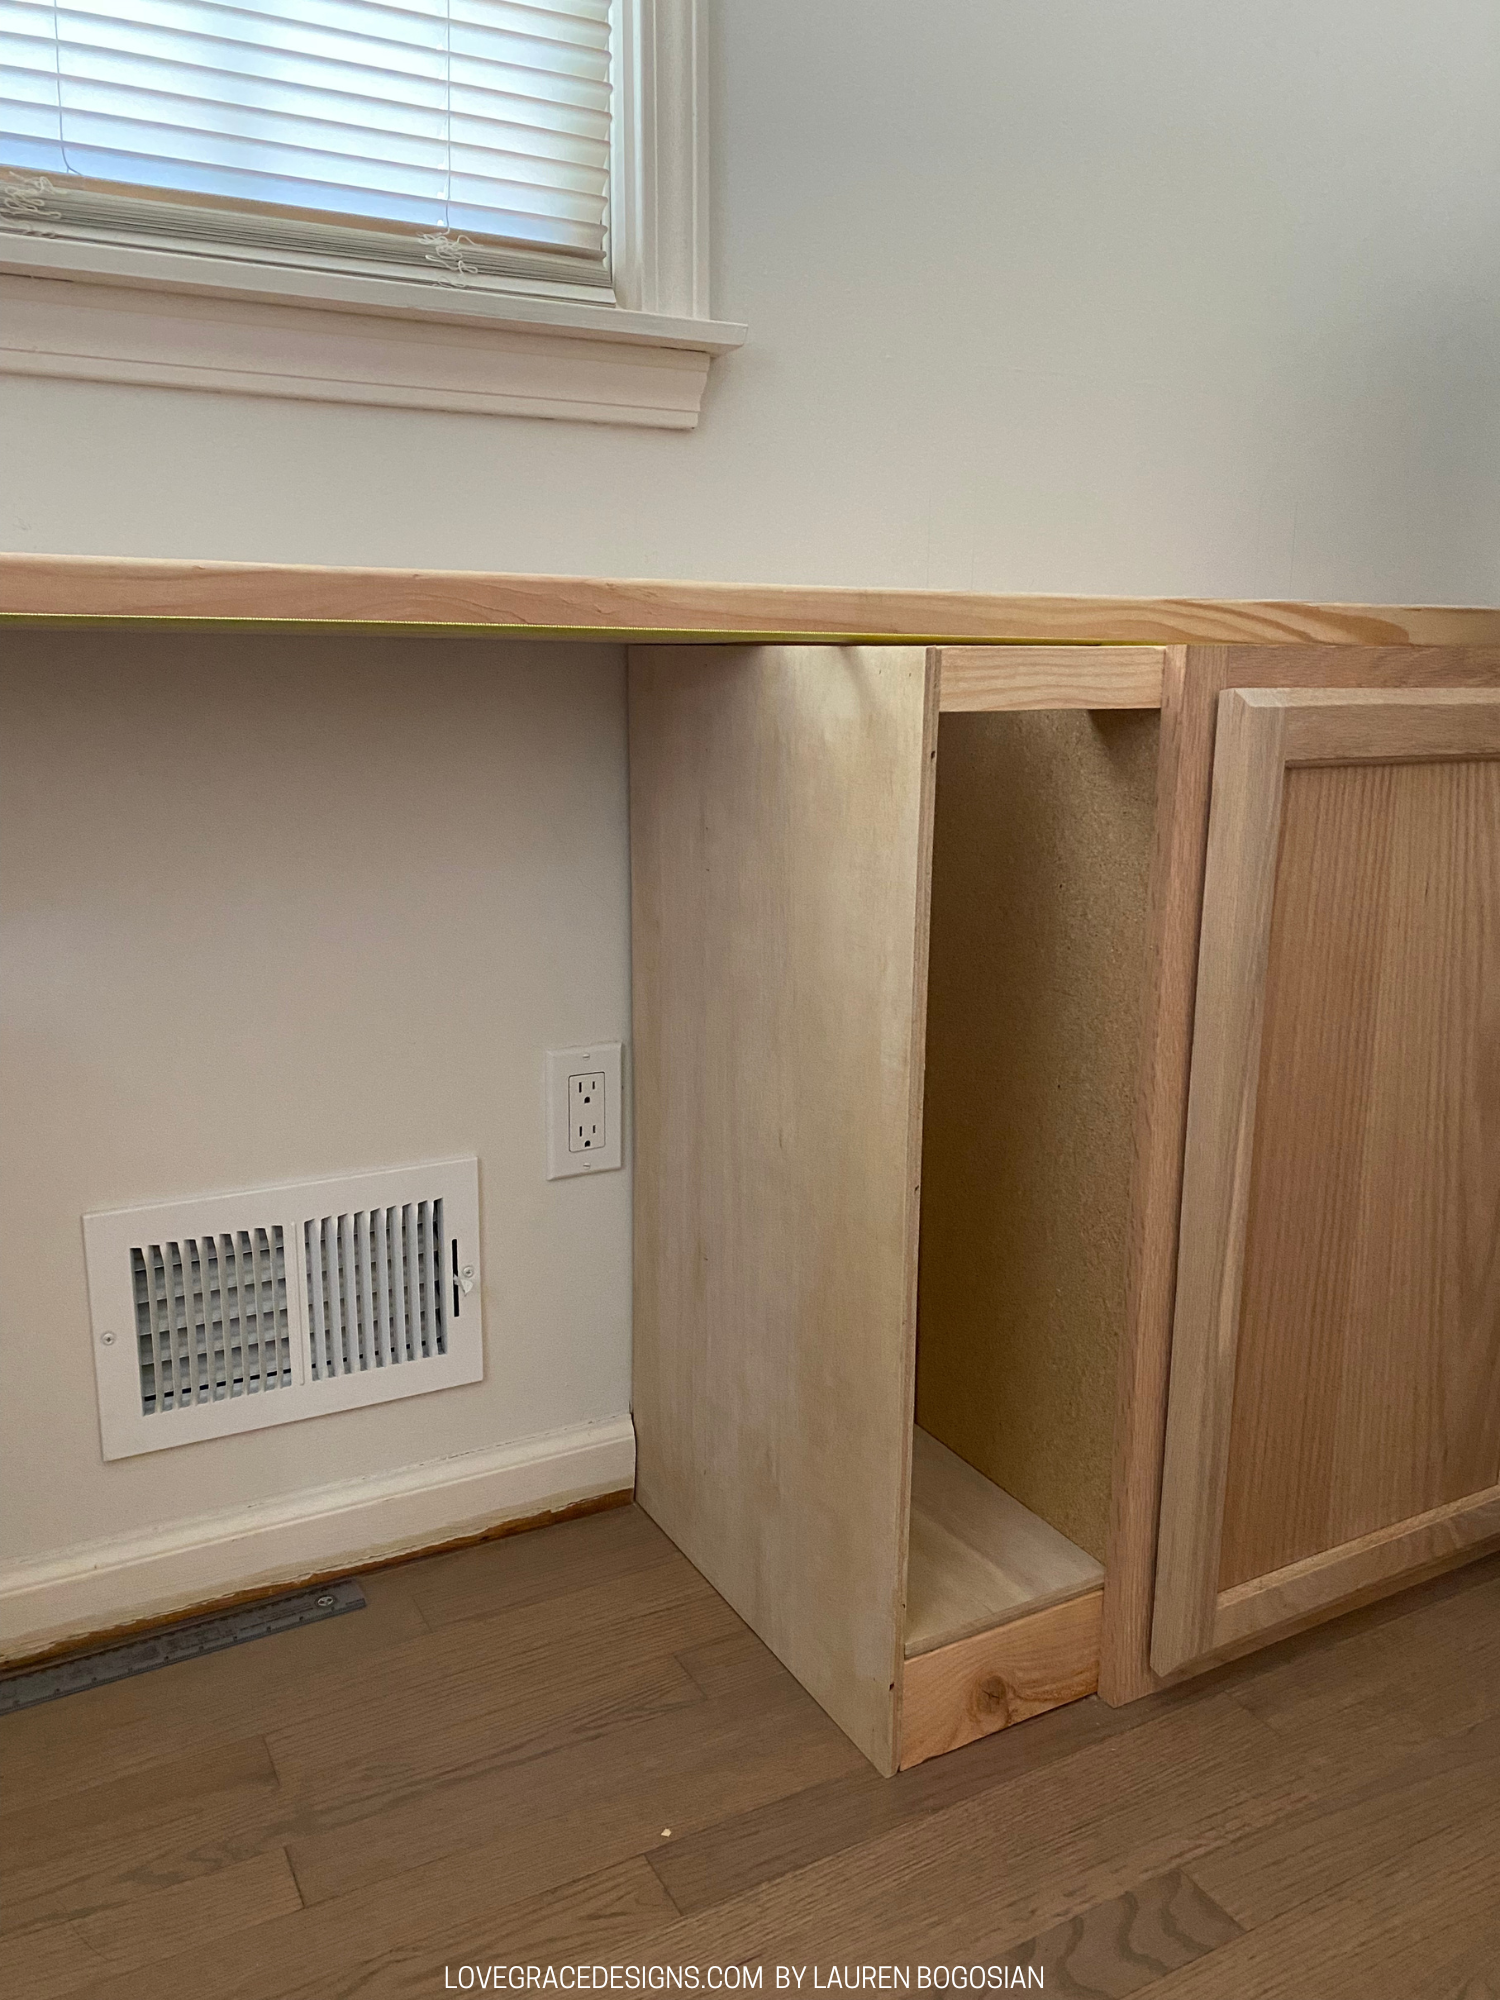
We didn’t get back to these shelves until the winter of 2023 and they weren’t fully complete with the trim until May 2023. We added in the shelf and debated how we wanted to do this. I suggest adding the shelf in before boxing it all out so you can maneuver the nail gun a litter easier, but we ultimately just nailed the shelf from the outside and inside the cabinets. We don’t do this regularly so for some that may be simple, but we measured a ton to make sure we hit the wood and didn’t miss the shelf and mess up all of the work we had done.
The trim for the shelf and side piece is honestly random molding I found in Home Depot. I scoured the wood shelves to see what would work. The top and bottom trim was a basic 1x4 and 1x2 piece so that was thankfully easy but the shelf and side trim pieces needed to be wide enough to cover the plywood framing but also thick/deep enough to come out and be flush to all the other wood on the shelves. Having it be flush and cohesive is what gives the custom, built in look so it was much more difficult than it sounds.
Paint
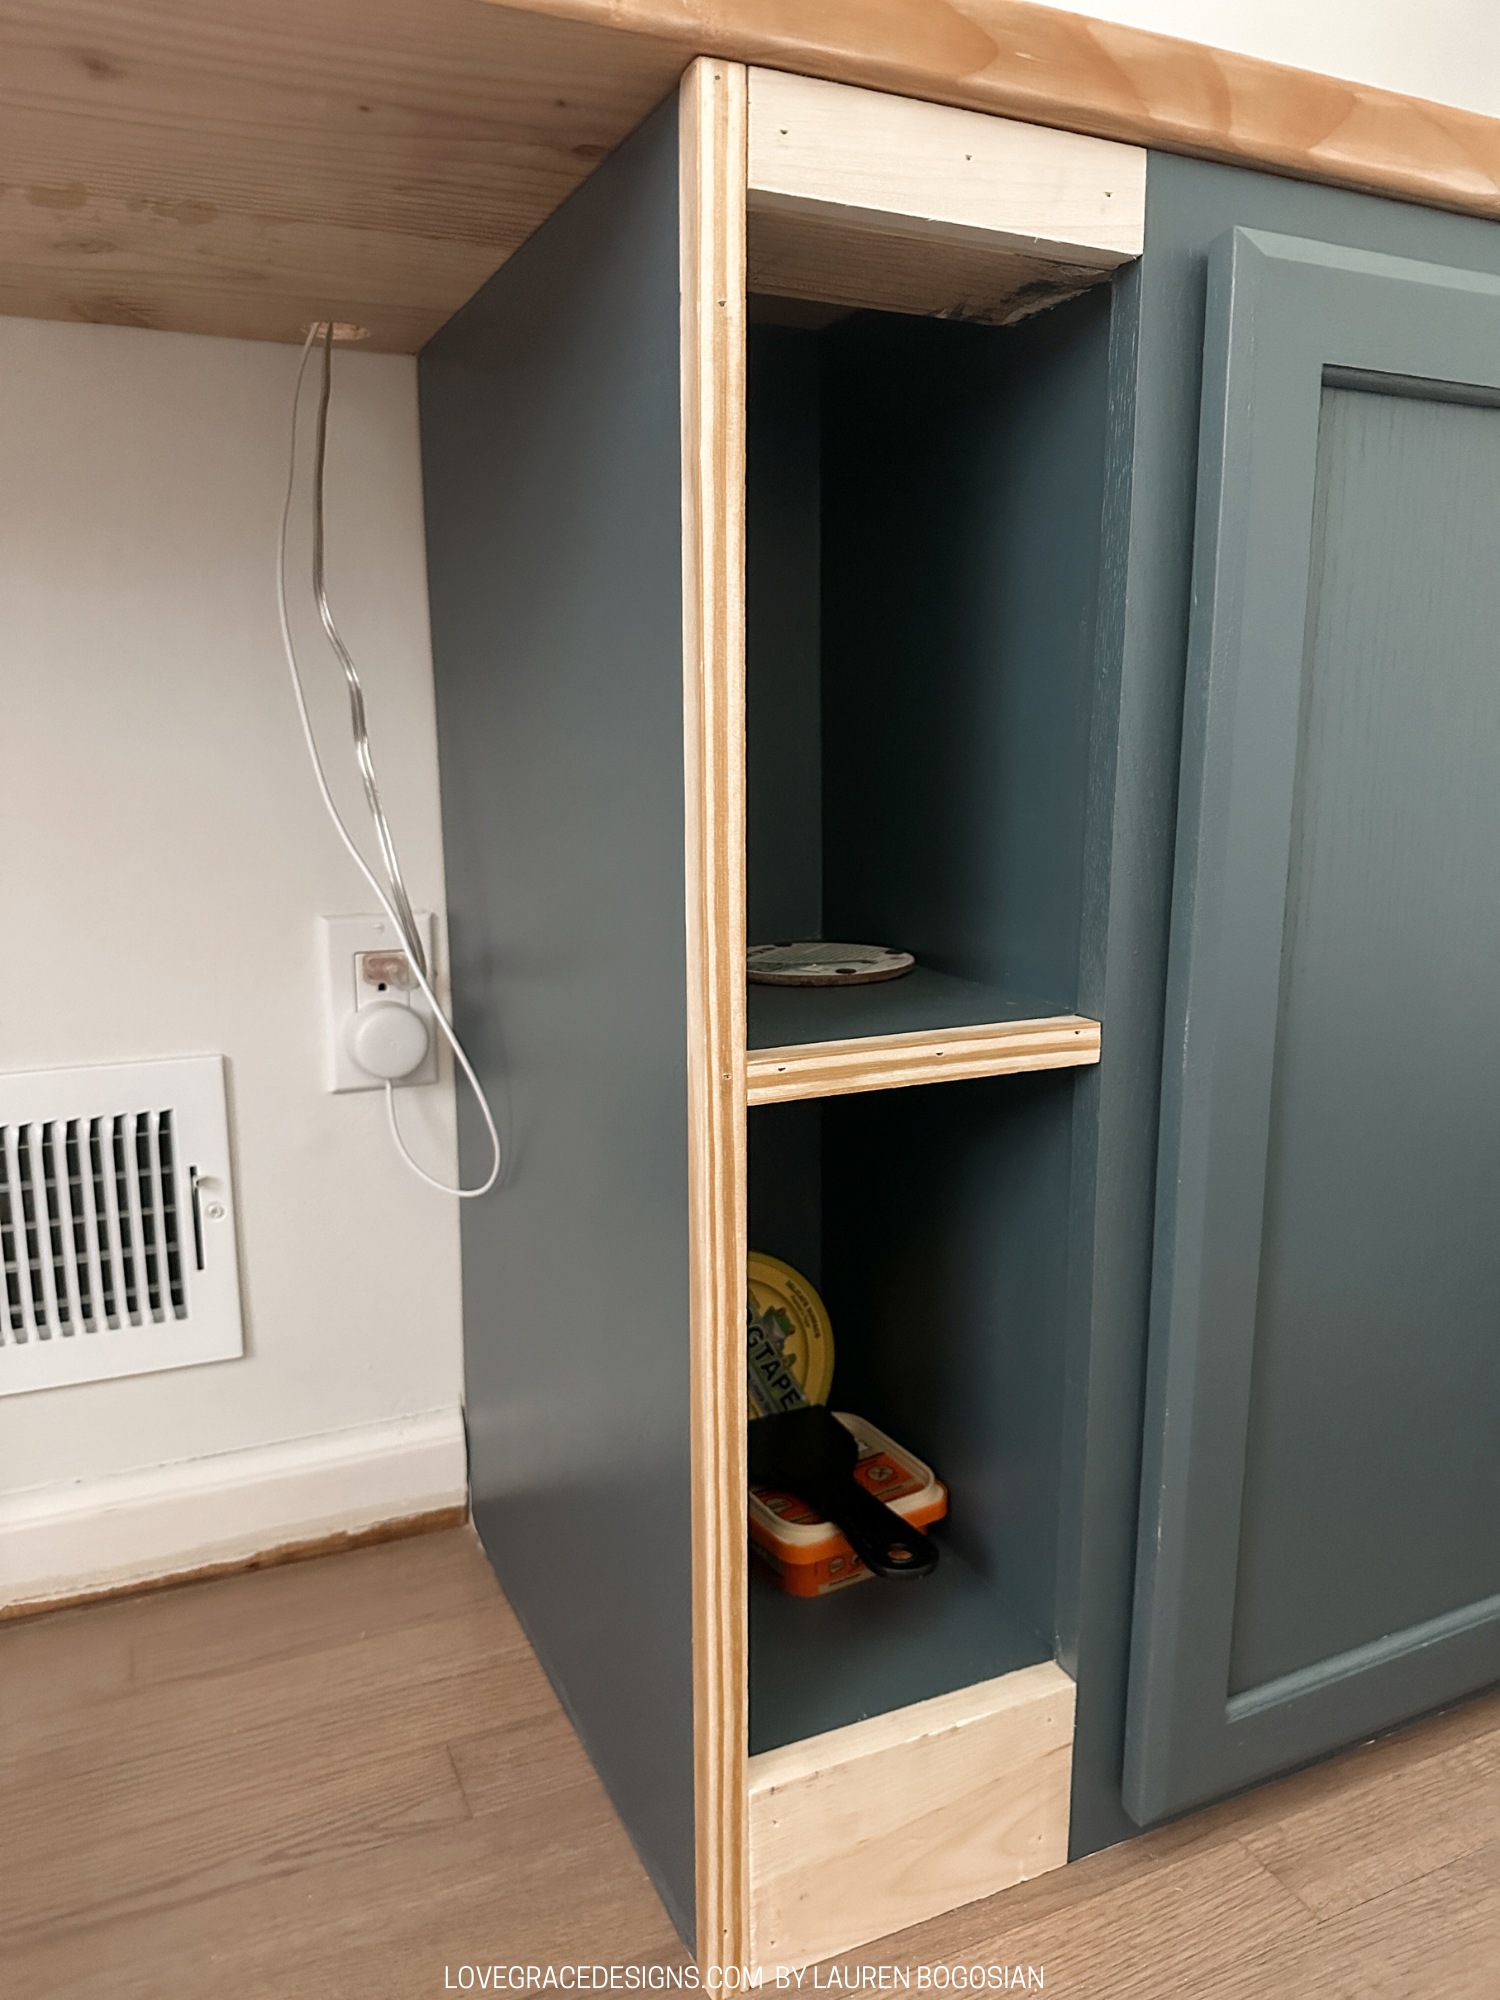
Before everything was fully complete, we wanted to have a paint color chosen or at least have some top options. After looking at tonsss of cabinet and office photos for inspiration, we narrowed down our options to 4 colors and got samples of each one. We decided on 2 deep blue colors and 2 deep green colors. I honestly LOVE them all and can see using any of these colors at some point, but we had to decide which the cabinets would be. I debated between the dark green and the lighter blue and we ultimately chose Grays Harbor by Benjamin Moore.
Once everything was drilled and nailed together, we moved on to painting the lower cabinets. We made sure to sand everything, caulk the seams, and patch where we added nails with wood filler. Steve removed the doors on the cabinets to paint the frame of the cabinets and then painted both sides of the doors with a paint roller and paint brush. We left the inside of the cabinets natural. We were going to paint them but they have a finish on them that would have made the process way longer and we just didn’t want to deal with that so ‘leave it natural’ was the decision!

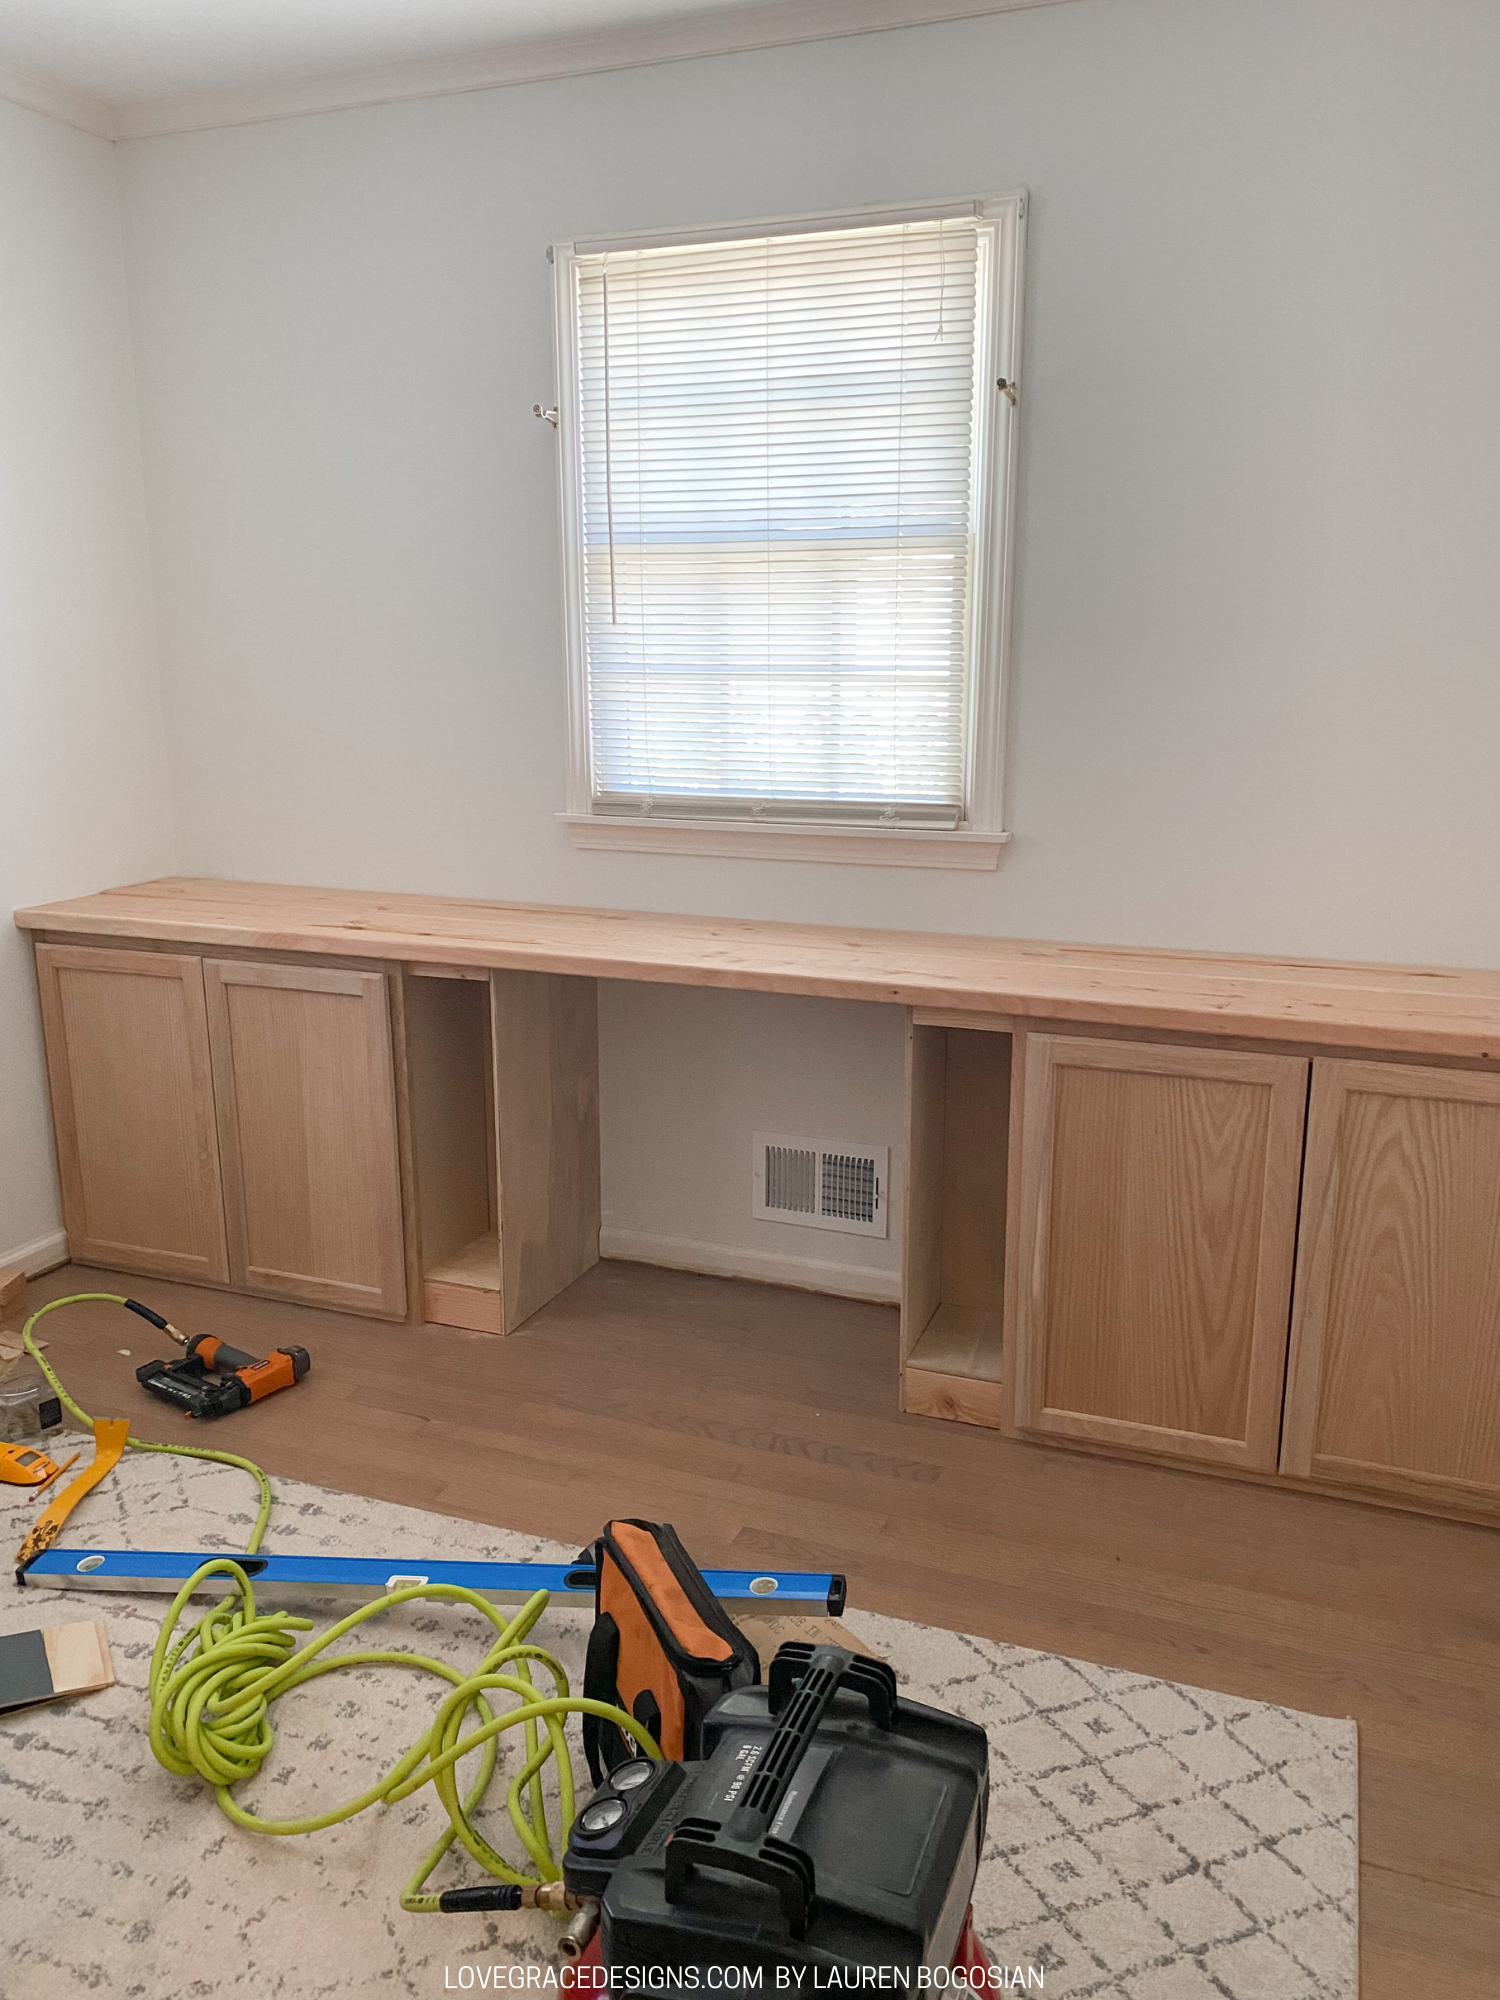
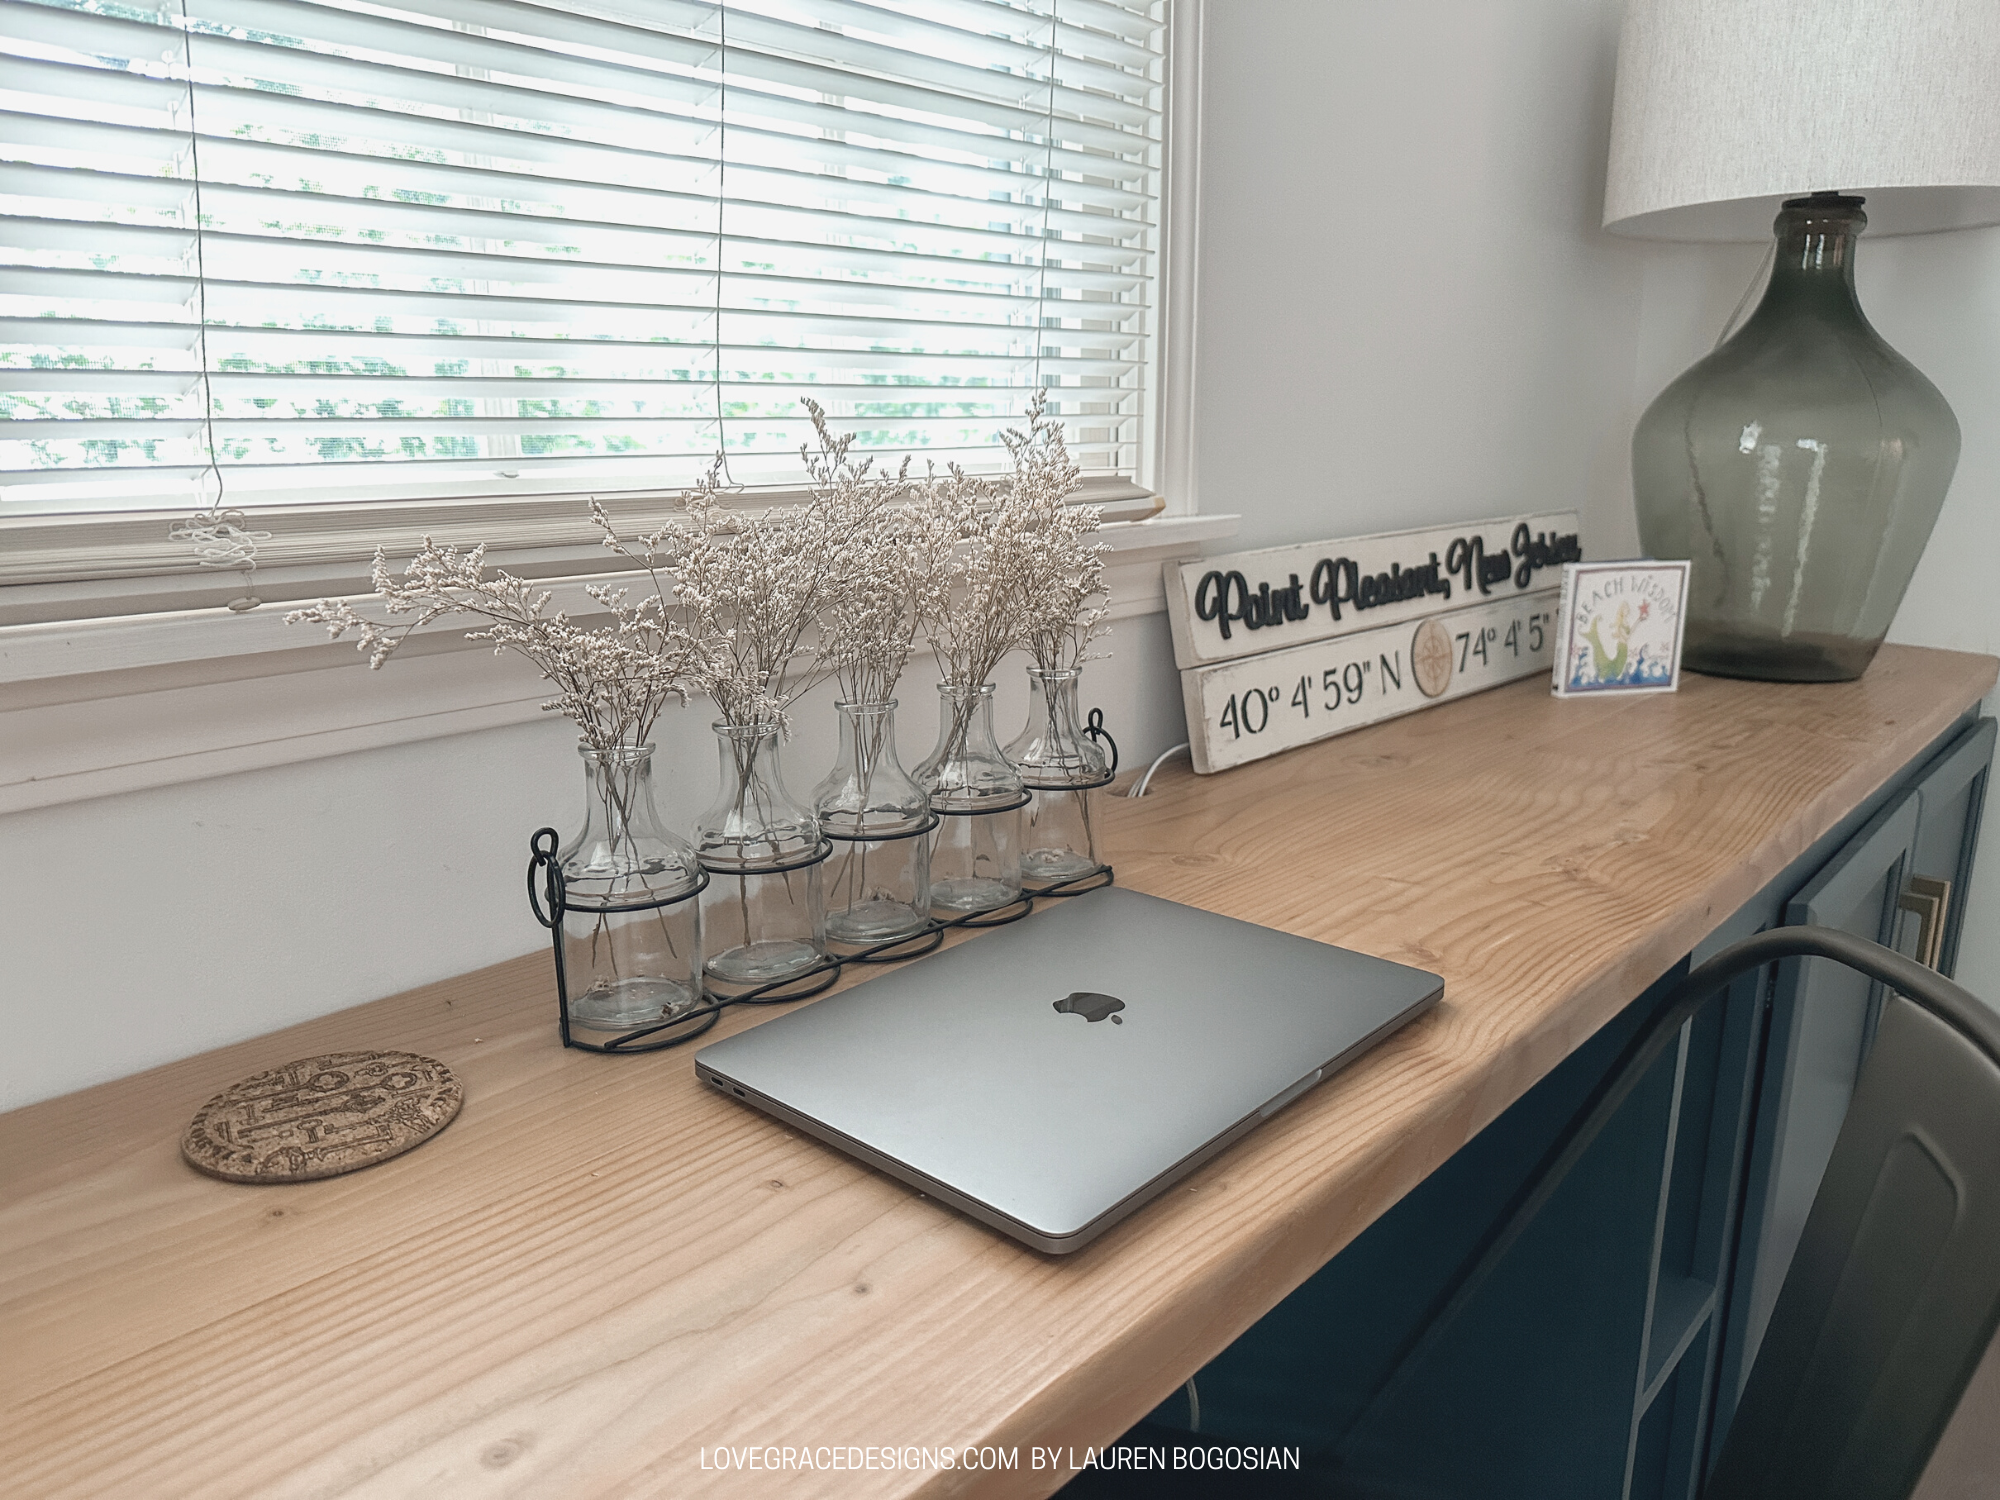
Countertop and Desk
The wood for the desk would need to be 10ft long and about 18in deep so we had to think of options for how we wanted to do this. We could order butcher block online but that costs a ton. We could put together pieces of plywood and then use an iron on veneer edging but I’m not a huge fan of that. We ultimately went with 2 pieces of 1x8 and decided to screw them together to then screw to the frame and cabinets. It was very difficult finding straight boards so we had to plane the sides of the with a hand planer. Steve did that for about a day trying to perfect and it still isn’t perfect, but they fit flush together much better than they did. If you have access to a professional wood planer where you can feed the wood through, that would be your best bet!
After the boards were sanded and planed, we made pocket holes with the kreg jig, added wood glue to the edge, and used pocket screws to screw them together. We clamped them together for a day before moving on the sanding it some more. I tested some stains and stain combinations out and wasn’t loving anything. I really wanted a white oak look but since we got whatever wood we could find, it was becoming difficult to create a stain combination that didn’t just look gray. I wound up sanding then bleaching with a mixture of bleach and a bit of water. I sponge it on evenly and wait for it to dry then continue a few coats of that. After that, I used a clear, matte wood sealant.
To install the desk/countertop, we used construction adhesive and clamped it down to the cabinets, then drilled from inside the cabinets up into the top.
Cabinet Pulls
The easiest part of all was choosing and installing hardware for the cabinet pulls. I have followed Battle Creek Hardware for the longest time on Instagram and I was just waiting for the opportunity to buy some of their pieces. This was finally the moment! I chose the 7 ½” Portland Classic Bar Pull in Florentine Brass. All we did to install them was eyeball where we like the placement, measure it out, and then did the painters tape trick to install exactly where to drill on each door.
The Final Look
The first phase of our diy built-in bookcase is finally complete and we are so happy! We are slowly organizing the cabinets so things have an actual place to live and not just be thrown in there. We aren’t decorating too much up top because phase 2 will be coming! We will probably look to try to enjoy our summer before we start anything major for phase 2 but stay tuned!
Save this post as built-in bookshelf and desk inspiration for a future DIY for your home office!